Adding Attachments
Documents stored on your computer can be added as attachments in most of the same areas that a document can be scanned in Propel Rx.
To learn more about adding attachments into various areas of Propel Rx, select the dropdowns below.
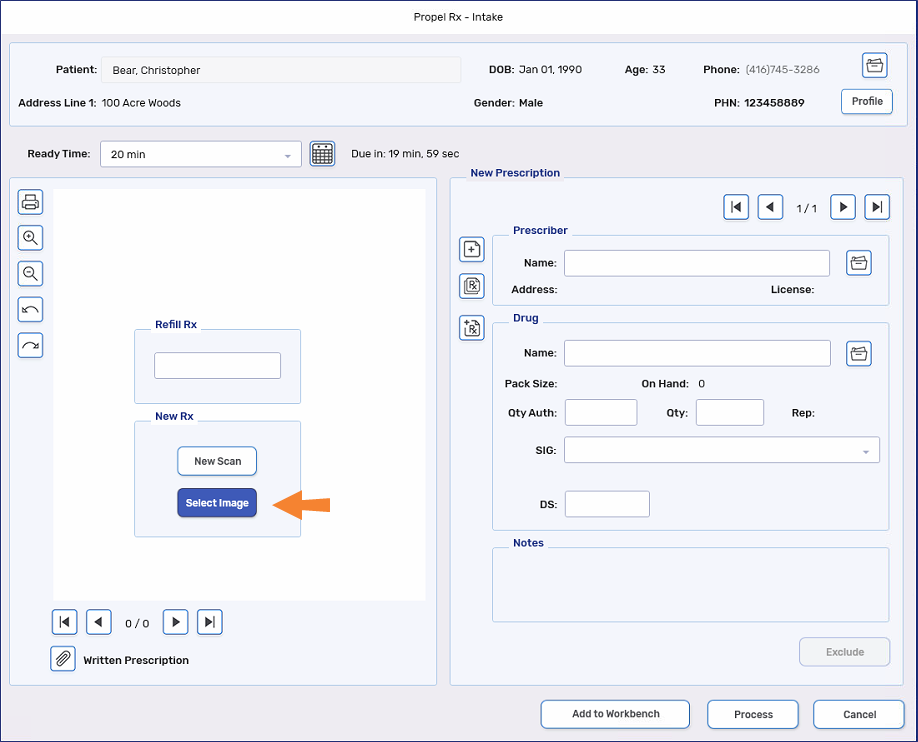
Documents added in the Intake window are attached to the prescription in the current Intake shell.
If you copy a prescription ![]() in the Intake window, the image is carried over to the new prescription shell.
in the Intake window, the image is carried over to the new prescription shell.
To add attachments in the Intake window:
-
From the Workbench or Patient Profile, select Intake. The Intake window opens.
-
In the Patient field, search for and select the patient.
This information is automatically populated if creating a new prescription from the patient's Profile tab.
-
Use one of the following options:
When the document is already attached to a prescription in the Patient Folder:
-
Select Select Image. The Select Rx Image window opens.

-
On the left hand side, select the attachment.
-
Press Select.
When the document is not attached to a prescription in the Patient Folder:
-
Select the Attachment button
 . File Explorer opens.
 -
Browse for and select the file.
-
Select Open.
The image appears on the left hand side.
-
-
Enter the prescription information as usual.
Documents added in Rx Detail are attached to the prescription.
To add an attachment in Rx Detail:
-
In Rx Detail, select the Attachments button
 . The Review window opens.
 -
Select the Add Attachment button
 . File Explorer opens.
 -
Browse for and select the file.
-
Select Open.
-
Select OK.
Documents added from the Patient Profile are attached to the selected prescription. The following steps can only be performed if an attachment already exists on the prescription. Otherwise, detail the prescription and complete the steps in Adding Attachments in Rx Detail.
To add an attachment from the Patient Profile:
-
Open the Patient Folder.
-
Select the Profile tab.
-
Select the paperclip icon
 for the prescription row. The Review window opens.
 -
Select the Add Attachment button
 . File Explorer opens.
 -
Browse for and select the file.
-
Select Open.
-
Select OK.
Various folders in Propel Rx have an Attachments tab for adding documents.
To add documents to an Attachments tab:
-
Open the folder (i.e., Patient, Prescriber, Group, Drug, Mixture, Supplier).
-
Select the Attachments tab.
- Select Add. File Explorer opens.
-
Browse for and select the file.
-
Select Open.
-
Select the appropriate title or type from the Description dropdown.
-
Select Save. The scanned document displays in the Attachments tab with a paperclip icon
 .
. 
Documents added from the Audit History are attached to the selected prescription in the Audit History. The following steps can only be performed if an attachment already exists on the prescription. Otherwise, detail the prescription and complete the steps in Adding Attachments in Rx Detail.
To add an attachment from the Audit History:
-
Open the prescription's audit history as per usual process.
-
Select the applicable row in the Audit History.
-
Select the Attachments
 or Review button. The Review window opens.
 -
Select the Add Attachment button
 . File Explorer opens.
 -
Browse for and select the file.
-
Select Open.
-
Select OK.
To add documents to a Batch:
-
Open the Batch Manager.
-
In the Batch History tab, locate the Batch row.
If you cannot locate the Batch, change the view by using the Display Options or Filter at the top.
-
Right click on the paperclip column
.png) in the Batch row. You can do this even if no attachment has been added yet.
in the Batch row. You can do this even if no attachment has been added yet. 
-
Select Attachment. The Attachment window opens.
-
Select Add. File Explorer opens.
-
Browse for and select the file.
-
Select Open.
-
Select the appropriate title or type from the Description dropdown.
-
Select Close.
Documents added from the Workflow tile are attached to the selected prescription.
-
On the Workflow tile or Daily Rx Count window, select the prescription to add the attachment to.
-
Right click on the paperclip column
 for the prescription row.
 -
Select Attachment. The Attachment window opens.
-
Select Add.
-
Browse for and select the file.
-
Select Open.
-
Select Close.
Documents scanned from the Dialogue window are attached to the prescription.
To scan documents from the Dialogue window:
-
Open the Dialogue window for the prescription. This can be accomplished using one of the following methods:
-
Dialogue tile > Complete
-
Patient Folder Clinical tab > Dialogue
-
Patient Folder Profile tab > Rx > Dialogue
-
-
Select the Attachment
 button. The Review window opens.
 -
Select the Add Attachment button
 . File Explorer opens.
 -
Browse for and select the file.
-
Select Open.
-
Select OK.