Transferring Out Prescriptions
In order to transfer out a prescription to another location, specific information related to that prescription and its dispense history is sent.
You can transfer prescriptions with a status of Complete, Amend, Amend Next, Hold, or Cancelled.
A transferred out prescription can be identified by checking the following locations:
-
Patient's Profile tab - prescription displays with a TRN status and a prescription number of zero.

-
Audit History - prescription displays with a Transferred status.

-
Rx Detail - the Transfer Out window displays upon detailing the prescription.

A prescription can be transferred from the Workbench or Patient Folder. Use the dropdowns below for more information on transferring out prescriptions.
Transfers cannot be reversed except in Newfoundland and Labrador (refer to page 132 in the DIS User Guide for more information). Confirm the correct prescriptions are selected before transferring.
-
Select Rx > Transfer. The Select Prescription window opens.
-
In the Patient field, enter the patient's name.
-
Select OK. The Patient Search window opens.
-
Select the correct patient from the search results. The patient's Profile tab opens.
-
Select the prescription(s) that need to be transferred out.
-
Select OK. The Audit History window opens.
If the prescription was previously transferred in, a prompt warns you of this and asks if you want to continue with the transfer. Select Yes to continue with the transfer.
-
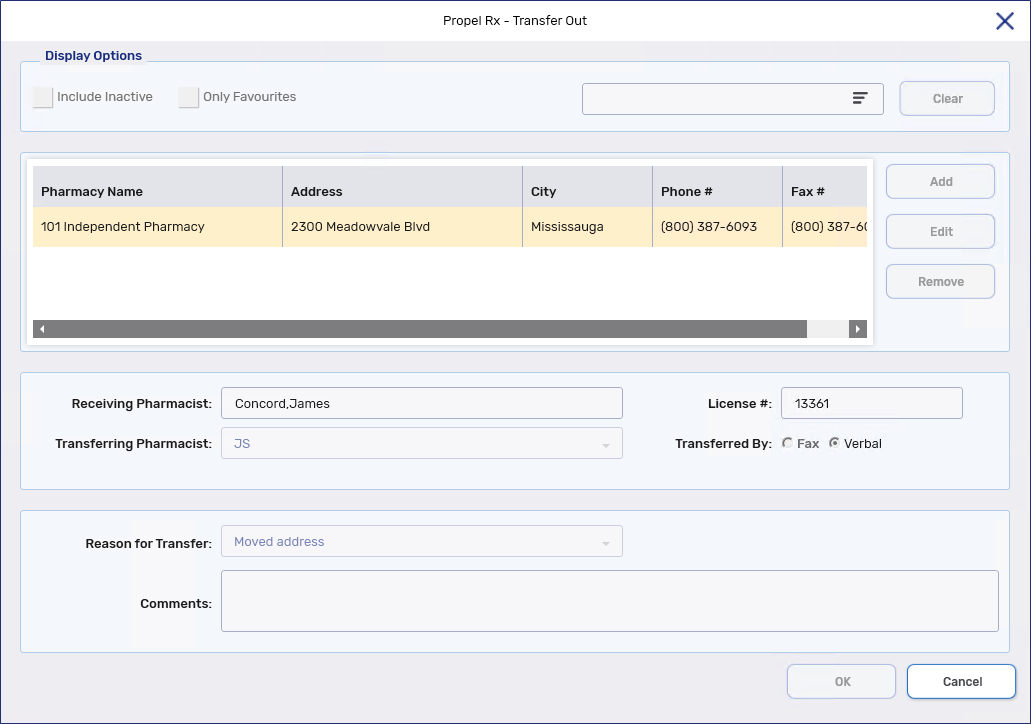
Select OK. The Transfer Out window opens.
-
Search for and select the name of the pharmacy that the prescription is being transferred to. For more information, see Locating Pharmacy Records.

-
If the pharmacy record does not exist, add them. more information, see Adding Pharmacy Records.
As Propel Rx is preloaded with a national database of pharmacies, a pharmacy record may already exist and may not need to be added. Perform a thorough search for the pharmacy using the methods outlined in step 8 before attempting to add a new record. If you add a new record that shares the same Pharmacy Name, Phone, or Fax as an existing record, a validation prompt will appear, and the record will not be saved.
-

-
In the Reason for Transfer dropdown, select the reason for the transfer.
Transfer details can be removed quickly by selecting Remove Transfer Details.

-
Add any additional comments in the Comments field.
-
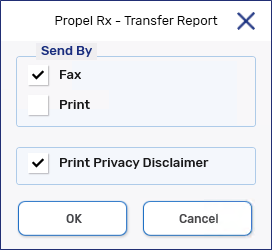
Select OK. The Transfer Report window opens.

-
Select the applicable checkbox to print and/or fax the transfer report. By default, the Print and Fax checkboxes are selected. A privacy disclaimer can be printed on the report if the option is selected in the window.
-
Select OK. The prescription(s) are transferred to the receiving pharmacy. The transfer report is printed and/or faxed if the options were selected in the Transfer Report window.
-
Open the Patient Folder.
-
Select the Profile tab.
-
Select the prescription(s) that need to be transferred out.
-
Select Rx > Transfer. The Audit History window opens.
-
Select OK. The Transfer Out window opens.
-
Search for and select the name of the pharmacy that the prescription is being transferred to. For more information, see Locating Pharmacy Records.

-
If the pharmacy record does not exist, add them. For more information, see Adding Pharmacy Records.
As Propel Rx is preloaded with a national database of pharmacies, a pharmacy record may already exist and may not need to be added. Perform a thorough search for the pharmacy using the methods outlined in step 6 before attempting to add a new record. If you add a new record that shares the same Pharmacy Name, Phone, or Fax as an existing record, a validation prompt will appear, and the record will not be saved.
-
In the Receiving Pharmacist and License # fields, enter the receiving pharmacist's name and their license number, respectively. Indicate whether the transfer is being sent by fax or verbally. Dropdown and change the Transferring Pharmacist if needed.

-
In the Reason for Transfer dropdown, select the reason for the transfer.
Transfer details can be removed quickly by selecting Remove Transfer Details.

-
Add any additional comments in the Comments field.
-
Select OK. The Transfer Report window opens.

-
Select the applicable checkbox to print and/or fax the transfer report. By default, the Print and Fax checkboxes are selected. A privacy disclaimer can be printed on the report if the option is selected in the window.
-
Select OK. The prescription(s) are transferred to the receiving pharmacy. The transfer report is printed and/or faxed if the options were selected in the Transfer Report window.