Sending an Authorization Request Through PrescribeIT® for a Split Rx
As prescriptions in a Split Rx Group are components of what was originally a single PrescribeIT® prescription, authorization requests for a Split Rx must reflect what was originally prescribed.
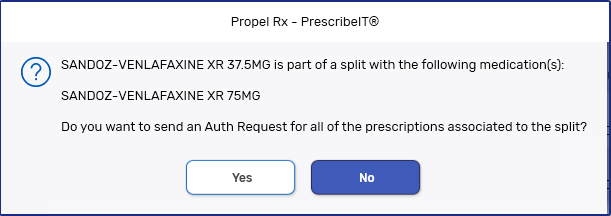
When attempting to generate an authorization request for a Split Rx prescription, a prompt appears asking if you want to send the authorization request for all prescriptions in the split. Depending on what you select in the prompt, other prescriptions in the split appear in the Authorization Request Form window for sending or as informational only.
Select the dropdowns to learn how to send an authorization request for a split Group.
-
From the patient's Profile tab, highlight one prescription that is part of the split.
-
Select Rx > AuthRequest. A prompt appears listing all drugs that are part of the split Group. From the prompt, you can indicate if you want to send the request for only the selected prescription or all prescriptions in the split.

-
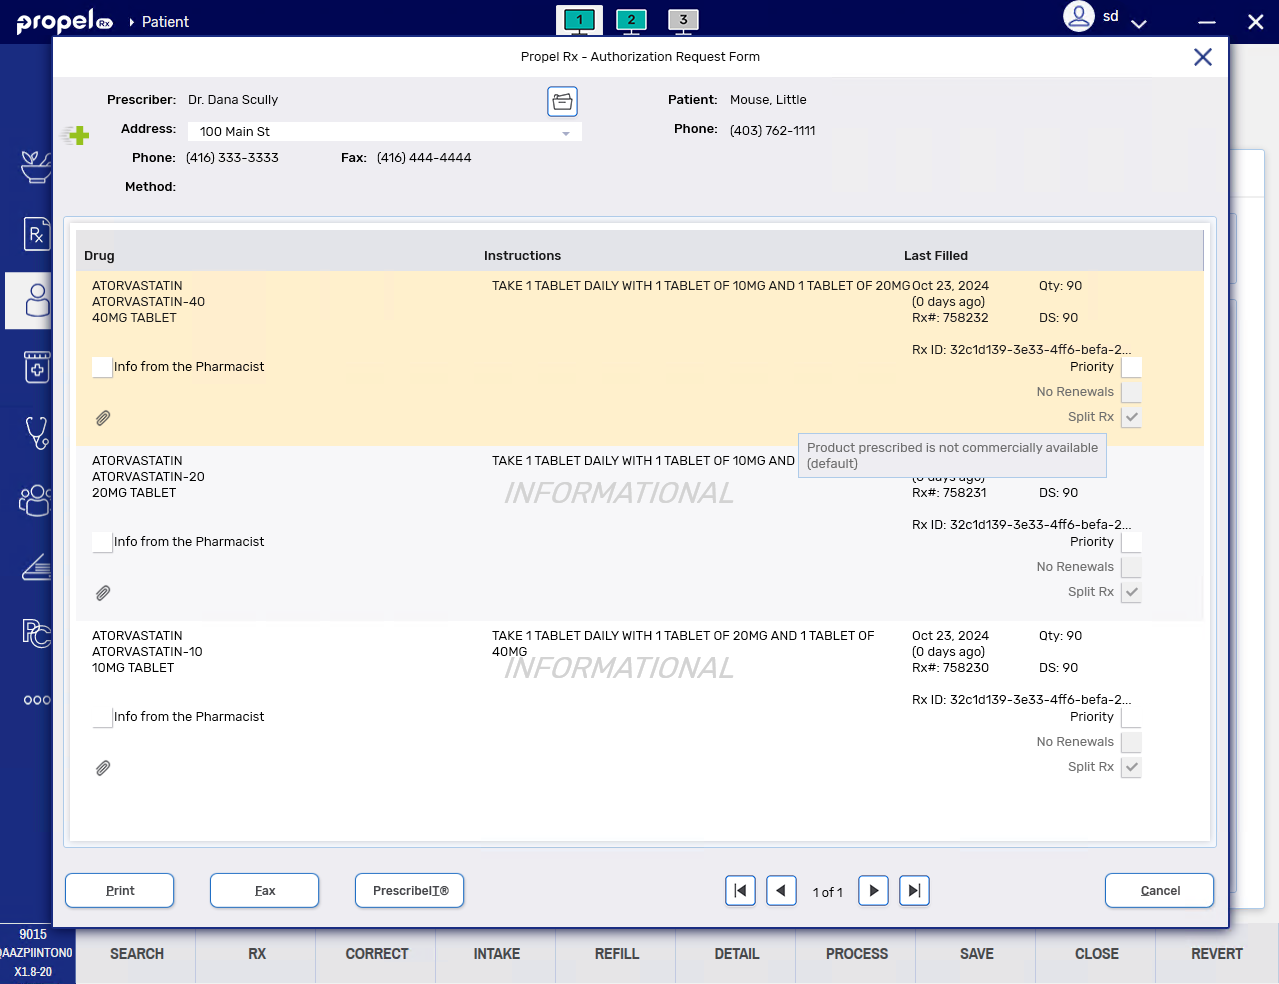
Select No. The Authorization Request Form window opens with all prescriptions in the split Group loaded. The prescriptions that were not selected for the authorization request will appear at the bottom as informational only, as indicated by a watermark.
Hover over the Split Rx checkbox to reveal additional details including the reason and comments for the split.

-
Ensure the following information is selected or correct:
-
Address - select the correct address from the dropdown.
The Address dropdown shows all recorded addresses for that prescriber. If an address (location) is not synchronized, the PrescribeIT® button will be disabled. When this occurs, the authorization request can be printed or faxed.
-
Priority checkbox - select if the authorization request should be treated with high priority.
-
Info from the Pharmacist - select if you want to add additional information to send to the prescriber. This information will be automatically added to all prescriptions in the split Group.
 Error Message
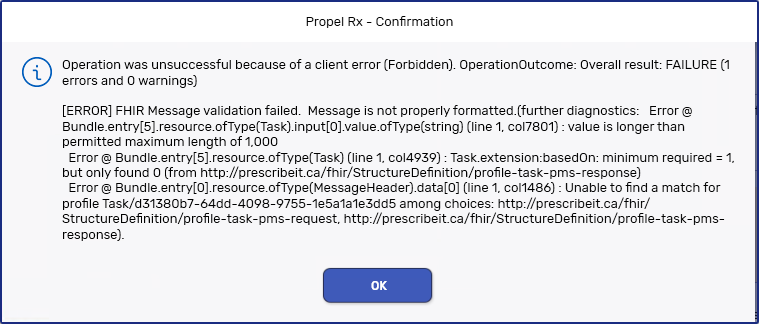
In the backend message to PrescribeIT®, the drug information for the split Group is transmitted with the Info from the Pharmacist in the same field. Although you can enter up to 1000 characters in the Info from the Pharmacist field, you will encounter the below error if the combination of the drug information plus Info from the Pharmacist exceeds 1000 characters.

If this occurs, shorten the text in the Info from the Pharmacist section.
-
-
Select the PrescribeIT® button to send the authorization request through PrescribeIT®.
-
A message above the Print button indicates the date and time that the request was sent through PrescribeIT®. The message remains visible until the window is closed. If the Authorization Request Form window is closed and reopened, the message does not display again.
-
The PrescribeIT® button becomes disabled. This prevents duplicate authorization requests from being sent to the prescriber in error.

-
If you chose to print or fax the authorization request, the form will exclude the prescriptions marked as informational only (i.e., only the prescriptions that were initially selected for the authorization request will be sent in the request).
-
The Authorization Request Form window stays open until you close it.
-
A record of the authorization request is added to the Patient Folder History tab. This record can be detailed to view the Authorization Request Response window again.
-
-
From the patient's Profile tab, highlight one prescription that is part of the split.
-
Select Rx > AuthRequest. A prompt appears listing all drugs that are part of the split Group. From the prompt, you can indicate if you want to send the request for only the selected prescription or all prescriptions in the split.

-
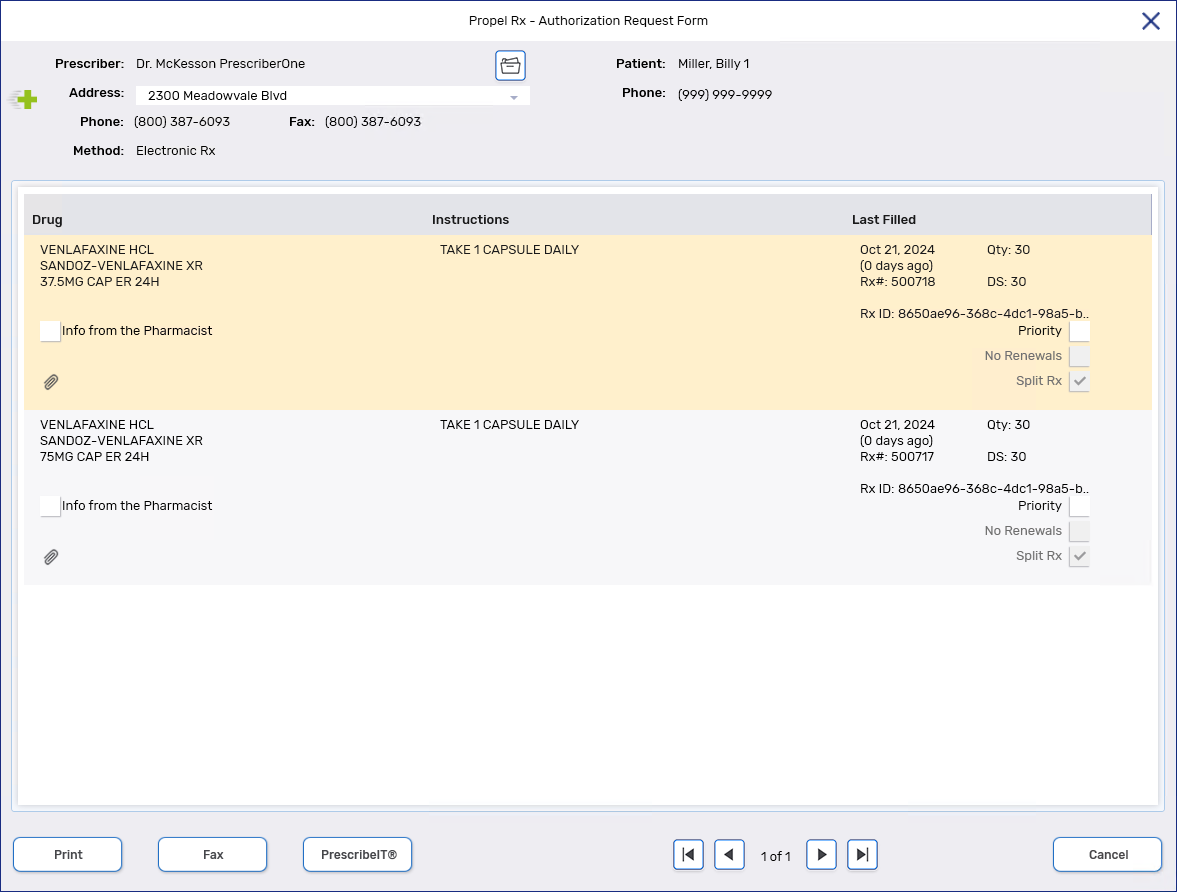
Select Yes. The Authorization Request Form window opens with all prescriptions in the split Group loaded.
Hover over the Split Rx checkbox to reveal additional details including the reason and comments for the split.

-
Ensure the following information is selected or correct:
-
Address - select the correct address from the dropdown.
The Address dropdown shows all recorded addresses for that prescriber. If an address (location) is not synchronized, the PrescribeIT® button will be disabled. When this occurs, the authorization request can be printed or faxed.
-
Priority checkbox - select if the authorization request should be treated with high priority.
-
Info from the Pharmacist - select if you want to add additional information to send to the prescriber. This information will be automatically added to all prescriptions in the split Group.
 Error Message
In the backend message to PrescribeIT®, the drug information for the split Group is transmitted with the Info from the Pharmacist in the same field. Although you can enter up to 1000 characters in the Info from the Pharmacist field, you will encounter the below error if the combination of the drug information plus Info from the Pharmacist exceeds 1000 characters.

If this occurs, shorten the text in the Info from the Pharmacist section.
-
-
Select the PrescribeIT® button to send the authorization request through PrescribeIT®.
-
A message above the Print button indicates the date and time that the request was sent via PrescribeIT®. The message remains visible until the window is closed. If the Authorization Request Form window is closed and reopened, the message does not display again.
-
The PrescribeIT® button becomes disabled. This prevents duplicate authorization requests from being sent to the prescriber in error.

-
The Authorization Request Form window stays open until you close it.
-
A record of the authorization request is added to the Patient Folder History tab. This record can be detailed to view the Authorization Request Response window again.
-
When sending an authorization request via PrescribeIT®, you can either send the authorization request for one or all prescriptions in the split Group. This is an Infoway limitation.
If the PrescribeIT® button is selected in this scenario, a prompt appears advising the request cannot be sent via PrescribeIT® and the button will then become disabled.

The steps below describe how to print or fax an authorization request in this scenario.
-
From the patient's Profile tab, highlight two or more but not all prescriptions that are part of the split Group.
-
Select Rx > AuthRequest. A prompt appears listing all drugs that are part of the split Group. From the prompt, you can indicate if you want to send the request for only the selected prescription or all prescriptions in the split.

-
Select No. The Authorization Request Form window opens with the selected prescriptions loaded.
-
Ensure the following information is selected or correct:
-
Address - select the correct address from the dropdown.
-
Info from the Pharmacist - select if you want to add additional information to send to the prescriber.
-
-
Do one of the following:
-
Select Print to print the form.
-
Select Fax to fax the form to the prescriber.
-
A message above the Print button indicates the date and time that the request was sent via fax. The message remains visible until the window is closed. If the Authorization Request Form window is closed and reopened, the message does not display again.
-
-
The Authorization Request Form window stays open until you close it.
-
A record of the authorization request is recorded in the Patient Folder History tab. This record can be detailed to view the Authorization Request Form window again.
-
PrescribeIT® Messages
Once an authorization request is sent via PrescribeIT®, all prescriptions associated with the split are displayed in the PrescribeIT® Messages > Pending tab. The Drug column will indicate if a prescription was informational. The prescriptions will move to the PrescribeIT® Messages > Completed tab once a response is received.
Hover over the Split Rx indicator to view all the drugs that are part of the split.

If an authorization request fails or is rejected by PrescribeIT®, all prescriptions associated to the split are marked as Failed and you can detail any one of them to view the failure.
Authorization Request Scenarios
This section outlines different scenarios you may encounter when sending an authorization request for a Split Rx Group.
Select the dropdowns to learn more.
The No Renewals checkbox is set by the prescriber when the transaction was sent through PrescribeIT® initially.
This flag does not prevent authorization requests from being sent, but the following prompt displays to confirm if the request should be sent. If proceeding with the authorization request, the Info from the Pharmacist checkbox is automatically selected and a note must be entered to inform the prescriber why the request is being sent.

In some situations, a resend of an authorization request via PrescribeIT® may or may not be allowed depending on the status of the previous request and whether the prescriber and/or address are the same.
If the request needs to be sent to the same prescriber at the same location and the status of the previous request is Waiting for Response, the prompt below will appear upon selecting the PrescribeIT® button. The resend will not be permitted.

If the request needs to be sent to the same prescriber at the same location and the status of the previous request has a status of Failed, Rejected, or Response Received, the resend will be permitted. A prompt will appear to indicate that an authorization request was previously received. Select Yes to continue with the action or No to send the authorization request by printing or faxing it.

If the request needs to be sent to a different prescriber or the same prescriber at a different location, the resend will be permitted.
Splitting an Authorization Request Response
Once you receive an Authorization Request Response from the prescriber for the Split Rx, you can process and split it again if needed. An Authorization Request Response is based on the original unsplit medication request. Therefore, it will not be automatically split when processed into Intake.
After splitting the PrescribeIT® prescription, use the Profile button in the Intake window to reauthorize the existing prescription on the Patient Profile. This will save you data entry time.