Documenting Consultations
Select the applicable tab to learn about documenting consultations in Propel Rx in your province.
When providing a consultation to a patient, such as an assessment and prescribing service, you may be required to document details of the consultation, notify the prescriber, and/or complete follow-ups with the patient. There are multiple methods to accomplish this using Propel Rx.
For more information on each method, select the dropdowns below.
Clinical Note
A professional service can be documented digitally using the Clinical Notes feature in the Patient Folder. To associate a prescription number to the clinical note, you must bill the prescription first and then add the clinical note.
To add a clinical note:
-
Open the Patient Folder.
-
Select the Clinical tab.
-
In the Clinical History section, select Add. The Clinical Notes window opens.
-
Dropdown the Type field and select Consultation.
-
Optional: Select a Duration and Service Level from the dropdowns.
-
In the Description field, enter the professional service being provided.

-
Optional: In the Rx # field, enter the prescription number.

-
Complete the Data section.

-
In the Assessment section, dropdown the Therapy field and select whether therapy was indicated or not. Enter comments in the Comments section. A rationale should be entered if therapy is not indicated.

-
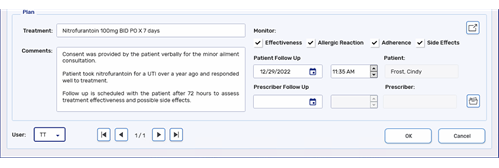
In the Plan section, complete the Treatment field and enter any comments if needed.
-
Select the applicable Monitor checkboxes.
-
Select a date for the Patient Follow Up. A follow up activity will be placed in the Activities tile on the specified date.
-
Optional: Select a date for the Prescriber Follow Up. A follow up activity will be placed on the Activities tile on the specified date.
-
Dropdown the User field and select the appropriate initials if needed.

-
Select OK.
-
Select Save.
There are two methods for notifying a prescriber of a professional service:
-
Print the clinical note and fax it to the prescriber
-
Fax a form to the prescriber
To print and fax a clinical note:
-
Open the Patient Folder.
-
Select the Clinical tab.
-
Select the clinical note in the Clinical History section.
-
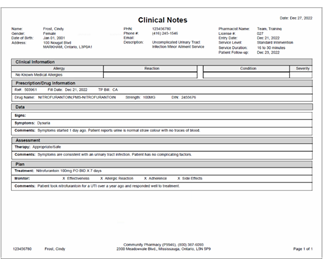
Select Print. Manually fax the clinical note to the prescriber.

-
Open the Patient Folder.
-
Select the Profile tab.
-
Select the prescription.
-
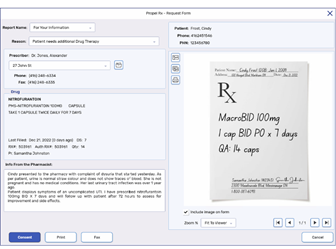
Select Rx > PFS > Forms. The Request Form window opens.
-
Dropdown the Report Name field and select For Your Information.
-
Dropdown the Reason field and select an appropriate option.
You can add custom report names and reasons in More > List Maint > Request Form - Names and Request Form - Reason for Communication. The form name or reason can be filtered in the Patient Folder History tab to locate it more easily.
-
Select the folder button
 in the Prescriber section to search for and select the patient's primary care provider.
 -
Enter any required information in the Info from the Pharmacist section.
-
Scan your consultation notes if needed by selecting the Single Scan
 and Duplex Scan
 buttons.
 -
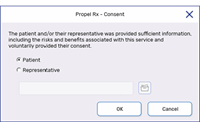
Select the Consent button. The Consent window opens.
-
Select the Patient or Representative option, depending on who gave consent for the professional service. If Representative is selected, search for and select the representative Patient Folder.

-
Select OK.
-
Select Fax. If you prefer to fax the form manually, select Print.

-
Select the X at the top right corner of the Request Form window to close it.
Once a form is printed or faxed, a Request Form Activity row is added to the Patient Folder History tab. This row can be selected and detailed to view the form again.

Patient follow up activities are scheduled automatically from the Clinical Notes window if a Patient Follow Up date is entered.
To complete the patient follow up activity:
-
On the Activities tile, select the Consult/Intervention Followup activity.
-
Select Complete. The Clinical Notes window opens.
-
Optional: Select a Duration and Service Level from the dropdowns.
-
In the Description field, enter the professional service that was provided.
-
Complete the remaining applicable fields in the window. If another follow up is required, select the date from the Patient Follow Up field.
-
Select OK.
Clinical notes, including follow ups, are recorded in the Clinical History section of the Patient Folder. These can be detailed for future reference.

Dialogue
A professional service can be documented digitally using the Dialogue feature in the Patient Folder. Dialogue must be associated to a prescription number. You must bill the prescription first before you can add Dialogue.
To add Dialogue:
-
Open the Patient Folder.
-
Select the Profile tab.
-
Select the prescription.
-
Select Rx > Dialogue. The Dialogue window opens.
-
In the Consultation section, select the appropriate With, Place, and Outcome options.
-
Select the New Therapy checkbox.

-
In the Notes field, enter your notes for the consultation.

-
In the Patient Follow-up section, select a date to follow up with the patient. A Dialogue Follow-Up activity will be placed in the Activities tile on the specified date.
-
In the Comment field, enter your follow up plan including Monitoring parameters.
-
Dropdown the User field and select the appropriate user initials if needed.

-
Optional: Select the Attachments button
 to scan
 or add
  documents if needed.
 -
Select Complete. The entered note will move to the Previous Notes section.
-
Select Save.
To notify the prescriber of a professional service that was conducted, a form can be faxed. If the patient does not have a prescriber, document that this is the case.
To fax a form:
-
Open the Patient Folder.
-
Select the Profile tab.
-
Select the prescription.
-
Select Rx > PFS > Forms. The Request Form window opens.
-
Dropdown the Report Name field and select For Your Information.
-
Dropdown the Reason field and select an appropriate option.
You can add custom report names and reasons in More > List Maint > Request Form - Names and Request Form - Reason for Communication. The form name or reason can be filtered in the Patient Folder History tab to locate it more easily.
-
Select the folder button
 in the Prescriber section to search for and select the patient's primary care provider.
 -
Enter any required information in the Info from the Pharmacist section.
-
Scan your consultation notes if needed by selecting the Single Scan
 and Duplex Scan
 buttons.
 -
Select the Consent button. The Consent window opens.
-
Select the Patient or Representative option, depending on who gave consent for the professional service. If Representative is selected, search for and select the representative Patient Folder.

-
Select OK.
-
Select Fax. If you prefer to fax the form manually, select Print.
-
Select the X at the top right corner of the Request Form window to close it.

Once a form is printed or faxed, a Request Form Activity row is added to the Patient Folder History tab. This row can be selected and detailed to view the form again.

Patient follow up activities are scheduled automatically from the Dialogue window if a Patient Follow Up date is entered.
To complete the patient follow up activity:
-
On the Activities tile, select the Dialogue Followup activity.
-
Select Complete. The Dialogue window opens.
-
Enter your follow up notes in the Notes section.
-
If additional follow up is required, select another date in the Follow Up on field.
-
Select Complete.
Dialogue is recorded in the Clinical History section of the Patient Folder. Follow up Dialogue notes are added to the initial Dialogue completed for the prescription. Dialogue can be detailed for future reference.

Manual
The manual method of documenting a professional service is paper based and involves writing consultation notes by hand and scanning the document into Propel Rx. The document can be scanned into one of two places:
-
Patient Folder Attachments tab. For more information, see Adding, Removing or Printing Patient Attachments.
-
prescription if a medication was prescribed and/or dispensed at your pharmacy. For more information, see Adding, Removing, or Printing Prescription Attachments.
To notify the prescriber of a professional service that was conducted, a form can be faxed. If the patient does not have a prescriber, document that this is the case.
To fax a form:
-
Open the Patient Folder.
-
Select the Profile tab.
-
Select the prescription.
-
Select Rx > PFS > Forms. The Request Form window opens.
-
Dropdown the Report Name field and select For Your Information.
-
Dropdown the Reason field and select an appropriate option.
You can add custom report names and reasons in More > List Maint > Request Form - Names and Request Form - Reason for Communication. The form name or reason can be filtered in the Patient Folder History tab to locate it more easily.
-
Select the folder button
 in the Prescriber section to search for and select the patient's primary care provider.
 -
Enter any required information in the Info from the Pharmacist section.
-
Scan your consultation notes if needed by selecting the Single Scan
 and Duplex Scan
 buttons.
 -
Select the Consent button. The Consent window opens.
-
Select the Patient or Representative option, depending on who gave consent for the professional service. If Representative is selected, search for and select the representative Patient Folder.

-
Select OK.
-
Select Fax. If you prefer to fax the form manually, select Print.
-
Select the X at the top right corner of the Request Form window to close it.

Once a form is printed or faxed, a Request Form Activity row is added to the Patient Folder History tab. This row can be selected and detailed to view the form again.

An activity can be created in the Activities tile to remind you to follow up with the patient after a consultation. For more information, see Creating a New Activity.
You can add custom activity types in More > List Maint > Calendar Activity.
When providing a consultation to a patient, such as an assessment and prescribing service, you may be required to document details of the consultation, notify the prescriber, and/or complete follow-ups with the patient. There are multiple methods to accomplish this using Propel Rx.
For more information on each method, select the dropdowns below.
Clinical Note
A professional service can be documented digitally using the Clinical Notes feature in the Patient Folder. To associate a prescription number to the clinical note, you must bill the prescription first and then add the clinical note.
To add a clinical note:
-
Open the Patient Folder.
-
Select the Clinical tab.
-
In the Clinical History section, select Add. The Clinical Notes window opens.
-
Dropdown the Type field and select Consultation.
-
Optional: Select a Duration and Service Level from the dropdowns.
-
In the Description field, enter the professional service being provided.

-
Optional: In the Rx # field, enter the prescription number.

-
Complete the Data section.

-
In the Assessment section, dropdown the Therapy field and select whether therapy was indicated or not. Enter comments in the Comments section. A rationale should be entered if therapy is not indicated.

-
In the Plan section, complete the Treatment field and enter any comments if needed.
-
Select the applicable Monitor checkboxes.
-
Select a date for the Patient Follow Up. A follow up activity will be placed in the Activities tile on the specified date.
-
Optional: Select a date for the Prescriber Follow Up. A follow up activity will be placed on the Activities tile on the specified date.
-
Dropdown the User field and select the appropriate initials if needed.

-
Select OK.
-
Select Save.
There are two methods for notifying a prescriber of a professional service:
-
Print the clinical note and fax it to the prescriber
-
Fax a form to the prescriber
To print and fax a clinical note:
-
Open the Patient Folder.
-
Select the Clinical tab.
-
Select the clinical note in the Clinical History section.
-
Select Print. Manually fax the clinical note to the prescriber.

-
Open the Patient Folder.
-
Select the Profile tab.
-
Select the prescription.
-
Select Rx > PFS > Forms. The Request Form window opens.
-
Dropdown the Report Name field and select For Your Information.
-
Dropdown the Reason field and select an appropriate option.
You can add custom report names and reasons in More > List Maint > Request Form - Names and Request Form - Reason for Communication. The form name or reason can be filtered in the Patient Folder History tab to locate it more easily.
-
Select the folder button
 in the Prescriber section to search for and select the patient's primary care provider.
 -
Enter any required information in the Info from the Pharmacist section.
-
Scan your consultation notes if needed by selecting the Single Scan
 and Duplex Scan
 buttons.
 -
Select the Consent button. The Consent window opens.
-
Select the Patient or Representative option, depending on who gave consent for the professional service. If Representative is selected, search for and select the representative Patient Folder.

-
Select OK.
-
Select Fax. If you prefer to fax the form manually, select Print.

-
Select the X at the top right corner of the Request Form window to close it.
Once a form is printed or faxed, a Request Form Activity row is added to the Patient Folder History tab. This row can be selected and detailed to view the form again.

Patient follow up activities are scheduled automatically from the Clinical Notes window if a Patient Follow Up date is entered.
To complete the patient follow up activity:
-
On the Activities tile, select the Consult/Intervention Followup activity.
-
Select Complete. The Clinical Notes window opens.
-
Optional: Select a Duration and Service Level from the dropdowns.
-
In the Description field, enter the professional service that was provided.
-
Complete the remaining applicable fields in the window. If another follow up is required, select the date from the Patient Follow Up field.
-
Select OK.
Clinical notes, including follow ups, are recorded in the Clinical History section of the Patient Folder. These can be detailed for future reference.

Dialogue Note
A professional service can be documented digitally using the Dialogue feature in the Patient Folder. Dialogue must be associated to a prescription number. You must bill the prescription first before you can add Dialogue.
To add Dialogue:
-
Open the Patient Folder.
-
Select the Profile tab.
-
Select the prescription.
-
Select Rx > Dialogue. The Dialogue window opens.
-
In the Consultation section, select the appropriate With, Place, and Outcome options.
-
Select the New Therapy checkbox.

-
In the Notes field, enter your notes.

-
In the Patient Follow-up section, select a date to follow up with the patient. A Dialogue Follow-Up activity will be placed in the Activities tile on the specified date.
-
In the Comment field, enter your follow up plan including Monitoring parameters.
-
Dropdown the User field and select the appropriate user initials if needed.

-
Optional: Select the Attachments button
 to scan
 or add
  the prescription for the medication if one was issued.
 -
Select Complete. The entered note will move to the Previous Notes section and the E-Signature window opens.
-
Enter your signature and select OK.
-
Select Save.
To notify the prescriber of a professional service that was conducted, a form can be faxed. If the patient does not have a prescriber, document that this is the case.
To fax a form:
-
Open the Patient Folder.
-
Select the Profile tab.
-
Select the prescription.
-
Select Rx > PFS > Forms. The Request Form window opens.
-
Dropdown the Report Name field and select For Your Information.
-
Dropdown the Reason field and select an appropriate option.
You can add custom report names and reasons in More > List Maint > Request Form - Names and Request Form - Reason for Communication. The form name or reason can be filtered in the Patient Folder History tab to locate it more easily.
-
Select the folder button
 in the Prescriber section to search for and select the patient's primary care provider.
 -
Enter any required information in the Info from the Pharmacist section.
-
Scan your consultation notes if needed by selecting the Single Scan
 and Duplex Scan
 buttons.
 -
Select the Consent button. The Consent window opens.
-
Select the Patient or Representative option, depending on who gave consent for the professional service. If Representative is selected, search for and select the representative Patient Folder.

-
Select OK.
-
Select Fax. If you prefer to fax the form manually, select Print.
-
Select the X at the top right corner of the Request Form window to close it.

Once a form is printed or faxed, a Request Form Activity row is added to the Patient Folder History tab. This row can be selected and detailed to view the form again.

Patient follow up activities are scheduled automatically from the Dialogue window if a Patient Follow Up date is entered.
To complete the patient follow up activity:
-
On the Activities tile, select the Dialogue Followup activity.
-
Select Complete. The Dialogue window opens.
-
Enter your follow up notes in the Notes section.
-
If additional follow up is required, select another date in the Follow Up on field.
-
Select Complete.
Dialogue is recorded in the Clinical History section of the Patient Folder. Follow up Dialogue notes are added to the initial Dialogue completed for the prescription. Dialogue can be detailed for future reference.

Manual
The manual method of documenting a professional service is paper based and involves writing consultation notes by hand and scanning the document into Propel Rx. The document can be scanned into one of two places:
-
Patient Folder Attachments tab. For more information, see Adding, Removing or Printing Patient Attachments.
-
prescription if a medication was prescribed and/or dispensed at your pharmacy. For more information, see Adding, Removing, or Printing Prescription Attachments.
To notify the prescriber of a professional service that was conducted, a form can be faxed. If the patient does not have a prescriber, document that this is the case.
To fax a form:
-
Open the Patient Folder.
-
Select the Profile tab.
-
Select the prescription.
-
Select Rx > PFS > Forms. The Request Form window opens.
-
Dropdown the Report Name field and select For Your Information.
-
Dropdown the Reason field and select an appropriate option.
You can add custom report names and reasons in More > List Maint > Request Form - Names and Request Form - Reason for Communication. The form name or reason can be filtered in the Patient Folder History tab to locate it more easily.
-
Select the folder button
 in the Prescriber section to search for and select the patient's primary care provider.
 -
Enter any required information in the Info from the Pharmacist section.
-
Scan your consultation notes if needed by selecting the Single Scan
 and Duplex Scan
 buttons.
 -
Select the Consent button. The Consent window opens.
-
Select the Patient or Representative option, depending on who gave consent for the professional service. If Representative is selected, search for and select the representative Patient Folder.

-
Select OK.
-
Select Fax. If you prefer to fax the form manually, select Print.
-
Select the X at the top right corner of the Request Form window to close it.

Once a form is printed or faxed, a Request Form Activity row is added to the Patient Folder History tab. This row can be selected and detailed to view the form again.

An activity can be created in the Activities tile to remind you to follow up with the patient after a consultation. For more information, see Creating a New Activity.
You can add custom activity types in More > List Maint > Calendar Activity.