Documenting a Minor Ailment Service in RxConsultAction
To learn about documenting a Minor Ailment service in RxConsultAction, select the applicable tab for your province.
Once a Minor Ailment service is initiated, documentation must be completed in RxConsultAction. Information is then written back to Propel Rx upon completion.
Do NOT close Patient Centre while RxConsultAction is open. If Patient Centre is closed, no write-back will occur to Propel Rx after documentation is complete in RxConsultAction.
To document a Minor Ailment service in RxConsultAction:
-
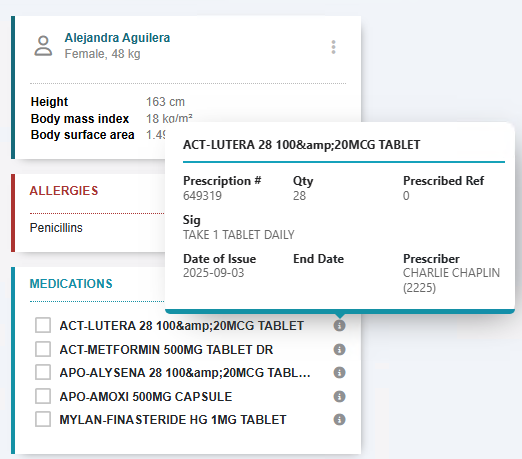
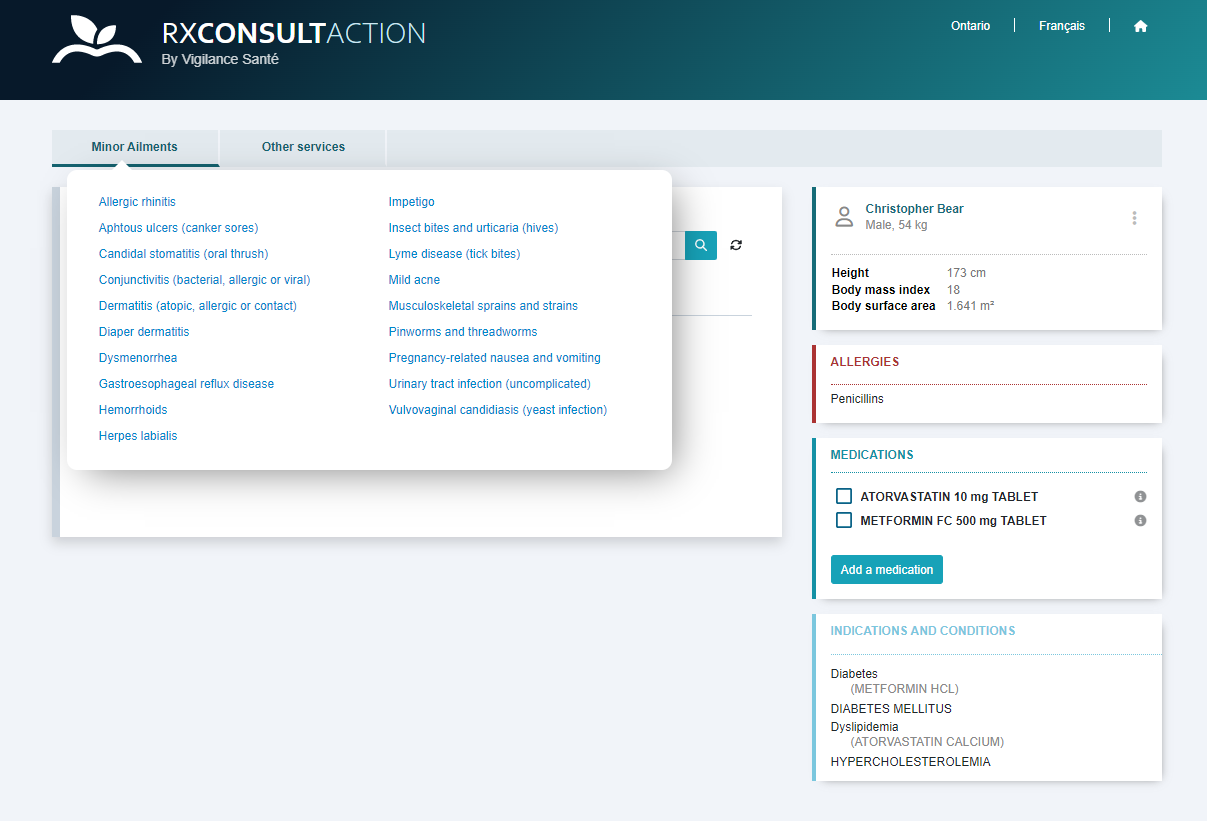
In RxConsultAction, review the patient's basic, clinical, and profile information on the right side. This information was sent from Propel Rx to RxConsultAction. To learn more about each section, select the dropdowns below.
 Basic Information
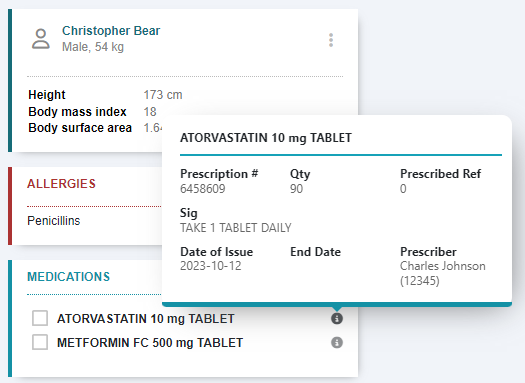
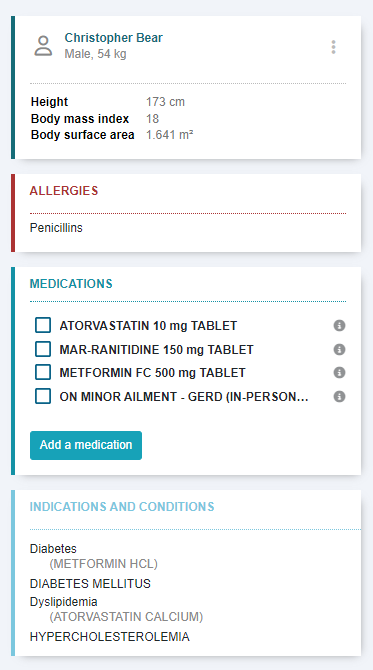
If the patient's height and weight are entered in the Patient Folder, they are displayed in this section. The Body mass index and Body surface area are calculated automatically based on the height and weight.
Allergies
Allergy Groups and Medical Allergies added to the Patient Folder display in this section. Other types of clinical information (e.g., Non-Medical Allergies, Lab Work, Diet, Reactions) and custom entries added through List Maintenance are not displayed.
Medications
The drugs on the patient's Profile in Propel Rx are sorted alphabetically by name and display in this section. If the drug has been refilled, only the most recent fill is listed. The following drugs are included:
-
Active prescriptions (including Cancelled)
-
Inactive prescriptions (e.g., Inactivated, Discontinued, Transferred, Revoked, Suspended) if the Written Rx Date falls within the date range specified by the Check for Interactions (days) preference in Propel Rx
Incomplete and Queued prescriptions are excluded.
You can hover over the i icon to view a tooltip with the following information:
The colour of the i icon indicates whether the prescription is Active (grey) or Inactive (red).
-Prescription stopped - Stop Date for the prescription if it was entered in the Administration Details window or the Performed On Date if the prescription was Discontinued.
-Prescription # and Qty
-SIG
-Date of Issue - Written Rx Date for the New or ReAuth prescription. This date is not changed on a refill.
-End Date- Rx Expiry Date for the prescription in the Rx Detail Extended tab.
-Prescriber
The Add a Medication button can be used to add a drug to the Medications list in RxConsultAction for your own reference. The drug will not be written back to Propel Rx, nor will interaction checking be performed.
Indications and Conditions
Conditions added to the Patient Folder display in this section. Other types of clinical information (e.g., Non-Medical Allergies, Lab Work, Diet, Reactions) and custom entries added through List Maintenance are not displayed.
Indications are provided by Vigilance Santé and correspond to the drugs listed in the Medications section.
Interaction checking is not performed in RxConsultAction. The Check for Interactions (days) preference is only used to retrieve the medications list. Interaction checking will be performed by Propel Rx when the prescriptions are processed.
-
-
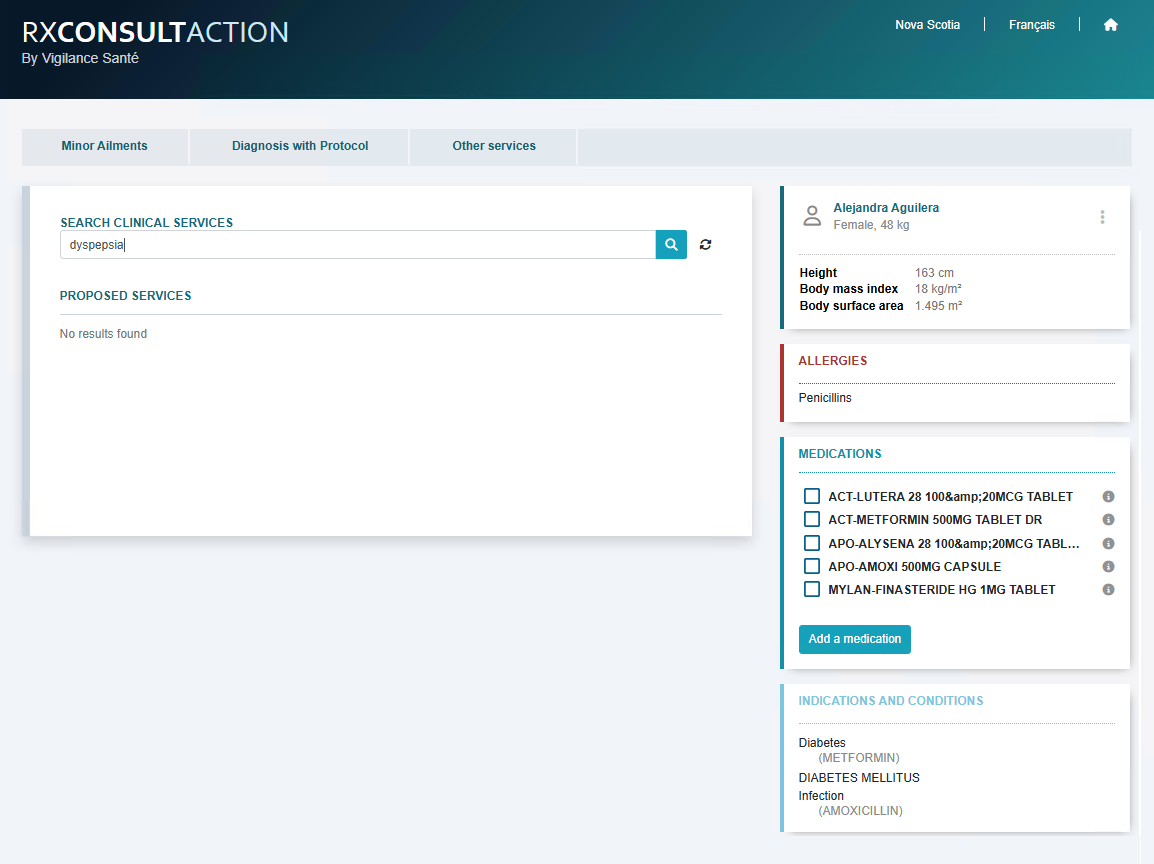
Do one of the following:
-
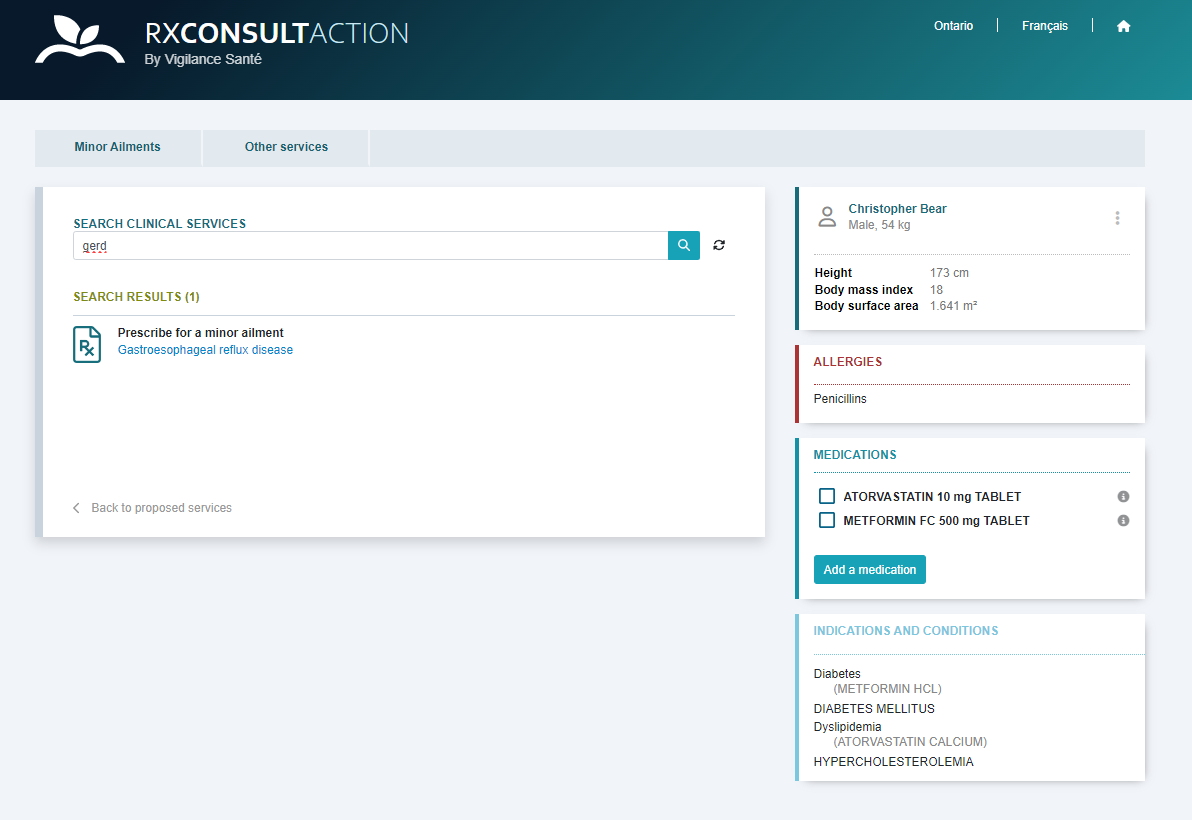
In the Search field, search for and select the Minor Ailment.
-
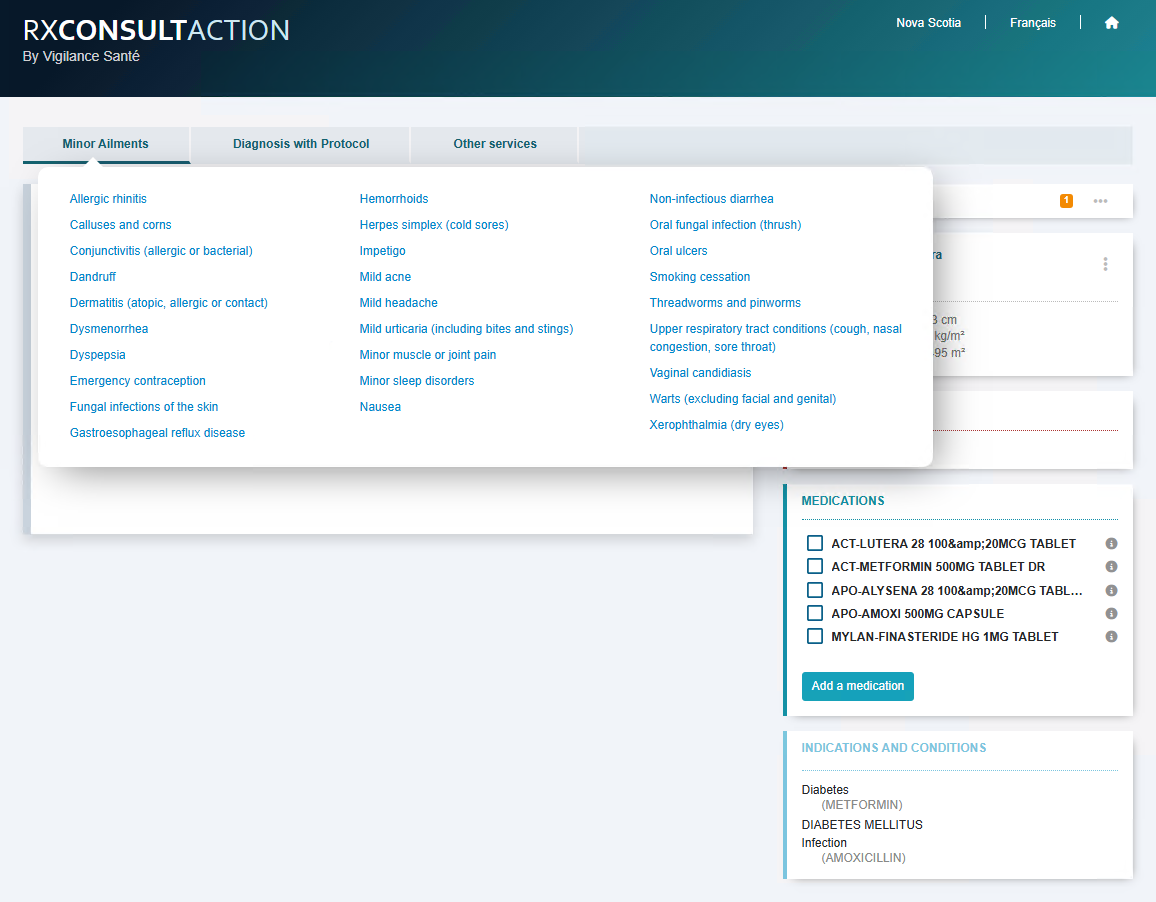
Select the Minor Ailments tab at the top and from the dropdown list, select the Minor Ailment.
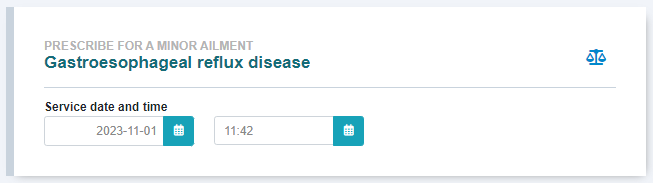
The Minor Ailment form launches. The content of the form for each Minor Ailment differs but the layout is similar.
-
-
Select a Service date and time that corresponds to when the consultation took place.
-
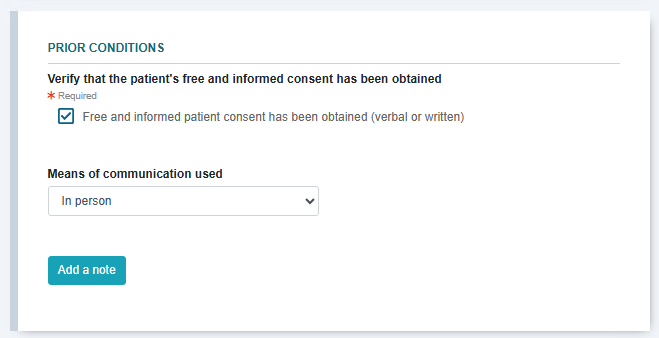
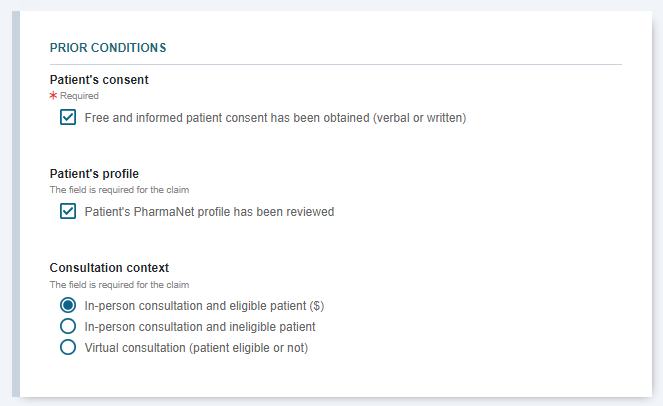
In the Prior Conditions section:
-
Select the checkbox for patient consent.
-
Select the checkbox confirming the patient's PharmaNet profile has been reviewed.
-
Select the appropriate option that reflects how the consultation was performed and the patient's coverage and clinical eligibility.
-
-
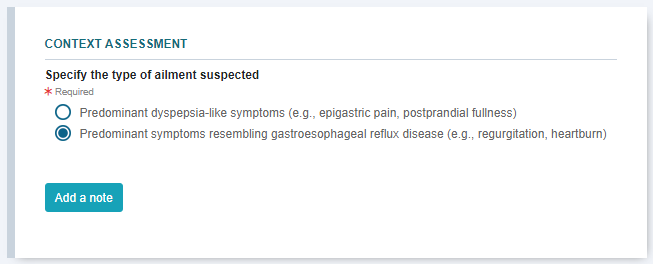
For some Minor Ailment services, a Context Assessment section may be visible. In this section:
-
Select the option that describes the suspected ailment.
-
Optional - If additional free-form notes need to be added, select the Add a note button and enter the information in the textbox provided. Notes added using this button will appear on the forms.
-
-
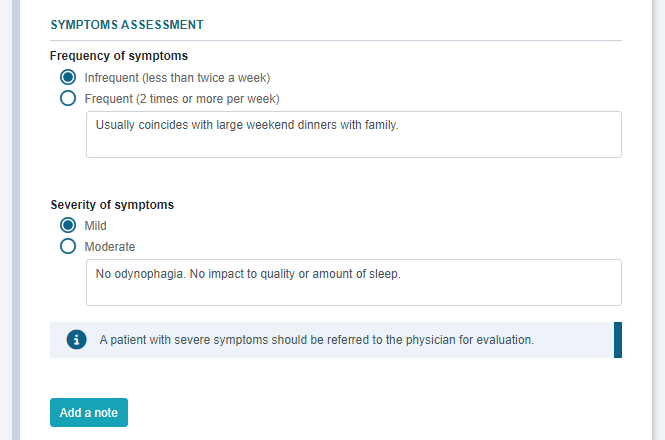
In the Symptoms Assessment section, select the frequency and severity of the patient's symptoms. If additional details are entered, they print on the form.
-
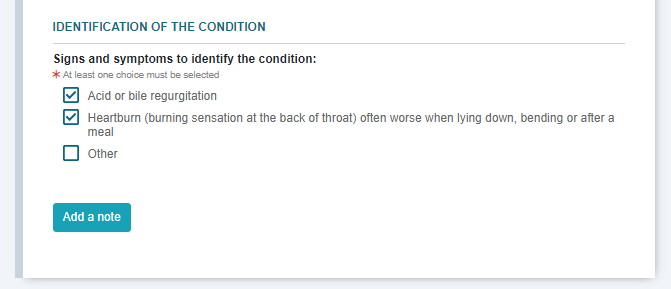
In the Identification of the Condition section, select the checkboxes for the signs and symptoms that the patient presented. If Other is selected, a textbox appears for you to enter additional information.
-
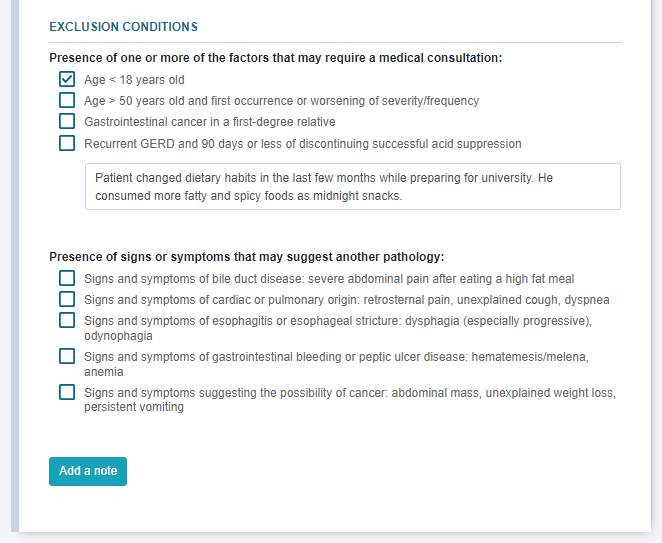
In the Exclusion Conditions section, select the checkboxes for one or more exclusion conditions that the patient qualifies for.
If an exclusion condition is selected, you may be required to enter a justification or the Prescribe section may be unavailable. However, you can still conclude a consultation even if exclusions exist, and the PFS prescription will write back to Propel Rx.
-
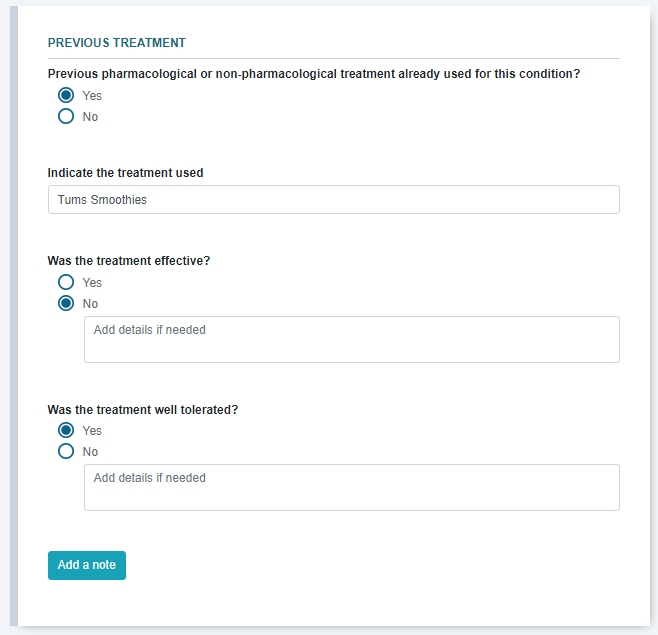
In the Previous Treatment section:
-
Select whether pharmacological or non-pharmacological treatment was already used for this condition.
-
If a treatment was previously used, specify what treatment was used and whether it was effective or tolerated. If additional details are entered, they print on the form.
-
-
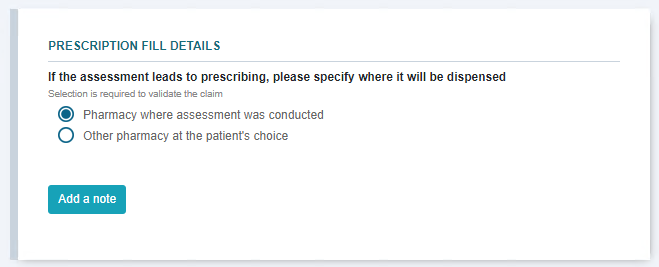
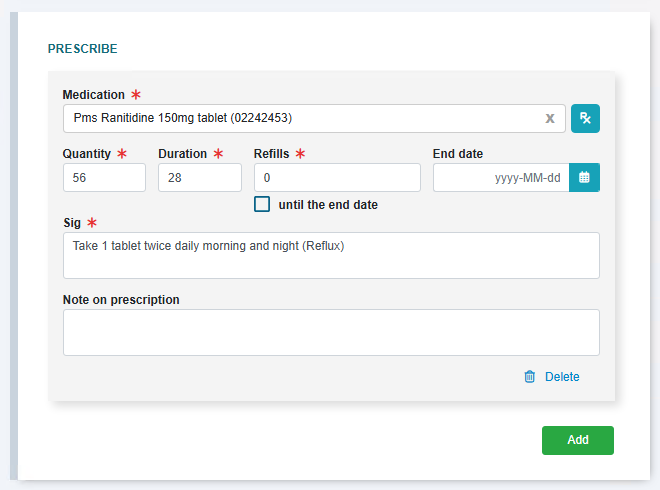
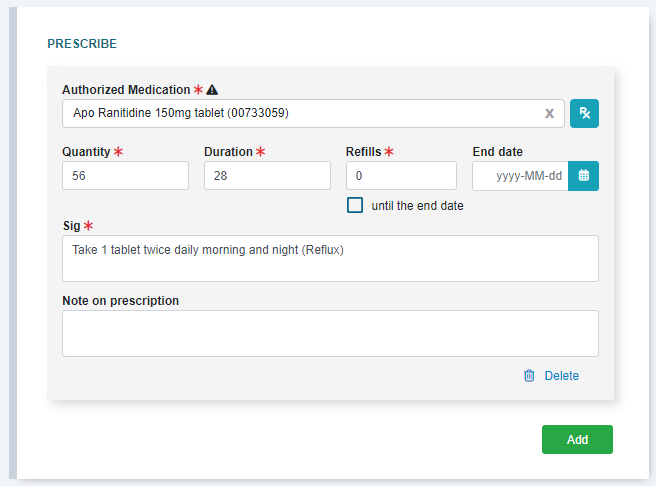
If a medication was prescribed, in the Prescribe section:
-
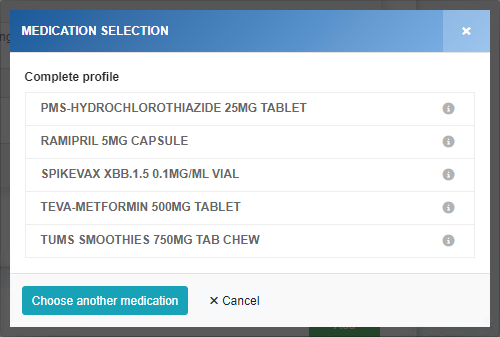
Select Add. The Medication Selection window opens displaying a list of drugs that can be prescribed under the pharmacist's scope of practice.
-
Select the drug that was prescribed.
In RxConsultAction, the drug's coverage status under the provincial plan is indicated with icons. A green checkmark beside the drug indicates that it's covered. An orange i indicates the drug is covered under certain conditions. A red slash indicates the drug is not covered.

-
Vigilance Santé auto-populates the following information: Authorized Medication, Quantity, Duration, Refillls, and Sig. Modify the fields if needed. An End date can be entered which becomes the prescription's End Date (in the Rx Detail Extended tab) in Propel Rx.
-
If needed, enter any free-form notes for the prescription. This will be written back to Propel Rx as a prescription level note.
-
Repeat steps i - iv to add another prescribed medication if applicable. There is no limit on the number of medications that can be prescribed from a single form.
-
-
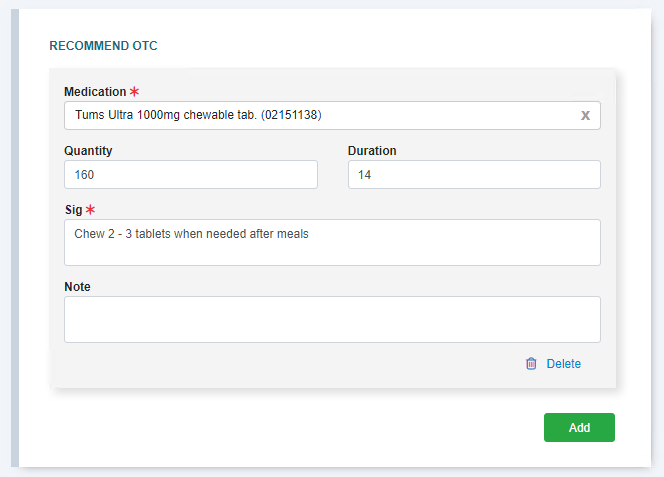
Optional - If an OTC was recommended for the patient, this can be printed on the forms. To do this, in the Recommend OTC section:
-
Select Add.
-
Enter the OTC medication that was recommended in the Medication field. As you type, you can select from a list of OTC medications in the dropdown.
-
Optional - Enter the quantity of the medication and the duration of the therapy.
-
Enter the SIG.
-
Optional - Enter any free-form notes for the OTC.
-
Repeat steps i - v to add another OTC medication if applicable.
Information entered in the Recommend OTC section is not written back to Propel Rx. If you want to add a DUR to the Patient Folder, you must do so from Propel Rx.
-
-
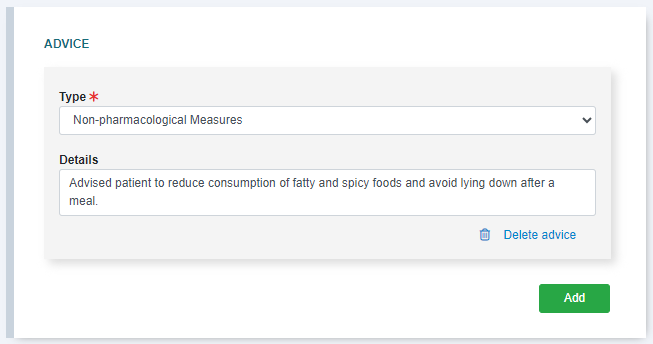
Optional - If advice was given to the patient during the consultation, this can be printed on the forms. To do this, in the Advice section:
-
Select Add.
-
Select the type of advice given to the patient.
-
Enter any free-form comments in the Details section.
-
Repeat steps i - iii to add more Advice entries if applicable.
-
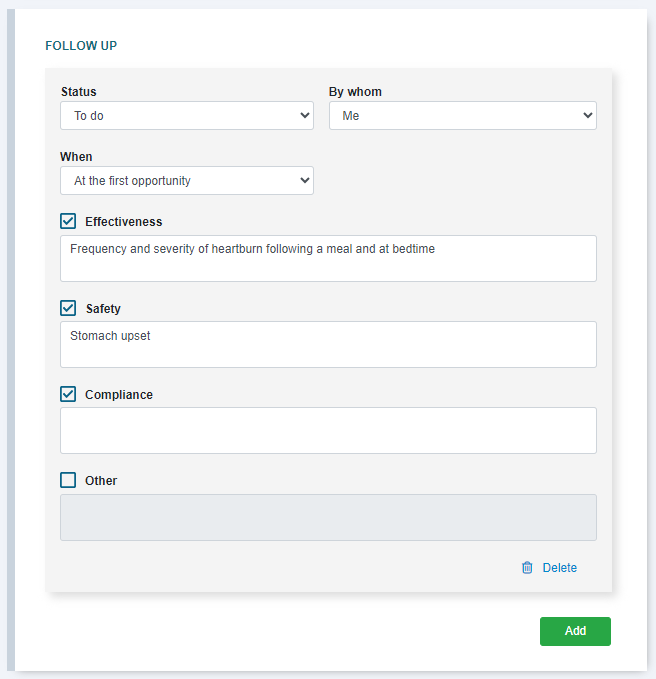
Optional - If you want to schedule a follow-up with the patient, you can create a Minor Ailment Follow-Up Activity in Propel Rx. To do this, in the Follow Up section:
-
Select Add.
-
In the Status field, select any option. There is no difference between these options in Propel Rx.
-
In the Who field, specify who will be following up with the patient. If Me is selected, the Activity will be assigned to the pharmacist who completed the Minor Ailment service. If any other option is selected, no user will be assigned to the Activity.
-
In the When field, select when the follow-up will occur.
When does my Activity appear in the Activities tile?
What was selected in RxConsultAction? What is the Scheduled Date in Propel Rx? At first opportunity Within 15 minutes after the Minor Ailment service was completed in RxConsultAction. On a specific date Within 15 minutes of the specified date and time. Following a specific date Within 15 minutes of the current time on the specified date.
Between two dates Within 15 minutes of the current time on the first date of the date range.
-
In the What section, select the checkboxes for the outcomes you'll be following up on. If desired, enter additional information in the Details section. This information will write back as Comments for the Activity.
-
If you want to schedule another Follow-Up Activity, repeat steps i - v.
-
-
Optional - If the patient was referred to another healthcare professional, you can print a referral form. To print a referral form, in the Refer section:
-
Select Add.
-
Select the healthcare professional type from the dropdown.
-
If desired, select the checkbox to include the consultation summary and prescriptions with the printed referral form.
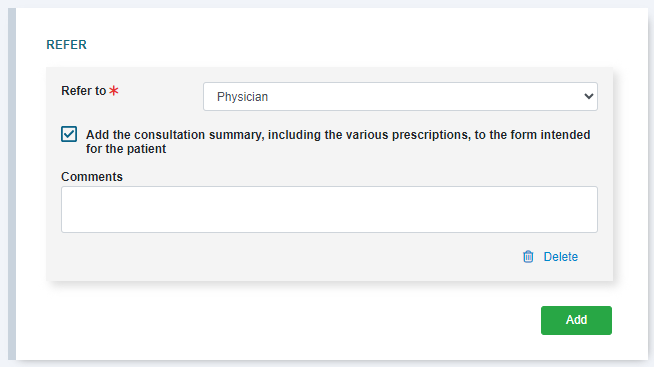
-
Enter any free-form comments in the Comments section.
-
Repeat steps i - iv to create another referral form.
-
-
Select Conclude intervention.
-
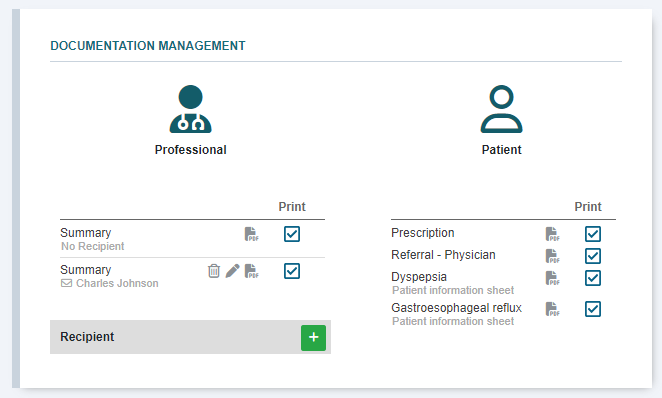
In the Documentation Management section, select the checkboxes for the forms you want to print. You don't need to print any forms to complete the Minor Ailment service.
-
Summary - can be provided to the patient's prescriber. To customize the form with a prescriber's information:
-
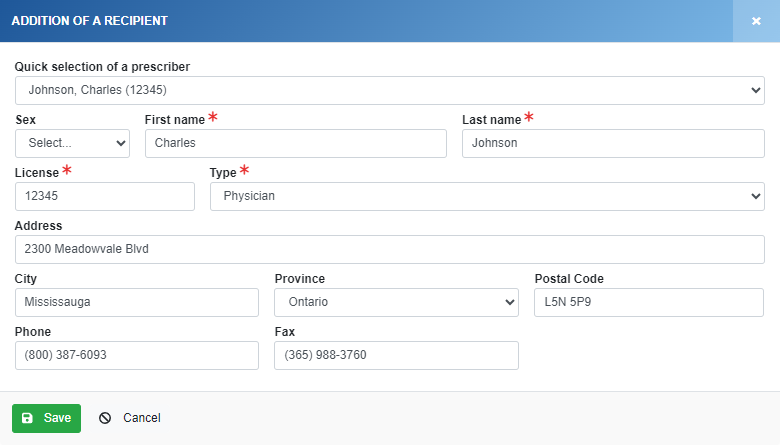
Select the plus button to add a recipient.
-
Select a prescriber from the dropdown list or enter information manually for the prescriber.
Only the prescribers that are associated with prescriptions for the patient in Propel Rx are listed. If you enter information manually for a prescriber, this information is not written back to the Prescriber Folder in Propel Rx.
-
Select Save to confirm the recipient.
-
Repeat steps i - iii to add another prescriber if needed.
-
-
Prescription - this is selected by default.
-
Referral - this is selected by default if the Refer section was completed on the form.
-
Patient Information Sheet - this option only appears if a sheet is available.
-
-
In the Claim section, select the appropriate outcome of the Minor Ailment service. This will determine what PIN is written back to Propel Rx for the PFS prescription.
If Do not claim is selected, the PFS prescription will not be auto-generated in Propel Rx, however the medication prescription(s) will still be created automatically. This can be useful if the RxConsultAction website is down, and you have to manually bill the prescriptions in Propel Rx and complete documentation later.
-
Select Finish and save.
-
The specified documents are printed and information is written back to Propel Rx.
-
If you have Cloud Fax, the Professional Summary is automatically faxed to the recipient prescriber(s). If Cloud Fax is not enabled, automatic faxing will not occur; you must manually fax the printed form. For more information, see Notifying the Prescriber of a Minor Ailment Service.
-
A success message appears in the top right corner of Patient Centre upon successful completion of the Minor Ailment service in RxConsultAction. This message will remain visible for 15 seconds or until you click on it.

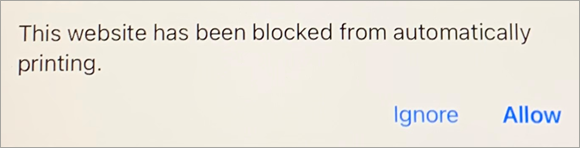
If you are using an iPad, do not select Print as an error will appear. You can print the documents if needed from Propel Rx (see Printing an Attachment for guidance). Please note, even if the error is invoked, documentation will still write back to Propel Rx.
-
-
Do one of the following:
-
Select X to close the RxConsultAction window and return to Propel Rx.
-
If you need to perform another Minor Ailment service for the same patient, select Return to homepage to initiate another consultation.
-
Once a Minor Ailment service is initiated, documentation must be completed in RxConsultAction. Information is then written back to Propel Rx upon completion.
Do NOT close Patient Centre while RxConsultAction is open. If Patient Centre is closed, no write-back will occur to Propel Rx after documentation is complete in RxConsultAction.
To document a Minor Ailment service in RxConsultAction:
-
In RxConsultAction, review the patient's basic, clinical, and profile information on the right side. This information was sent from Propel Rx to RxConsultAction. To learn more about each section, select the dropdowns below.
Basic Information
If the patient's height and weight are entered in the Patient Folder, they are displayed in this section. The Body mass index and Body surface area are calculated automatically based on the height and weight.
Allergies
Allergy Groups and Medical Allergies added to the Patient Folder display in this section. Other types of clinical information (e.g., Non-Medical Allergies, Lab Work, Diet, Reactions) and custom entries added through List Maintenance are not displayed.
Medications
The drugs on the patient's Profile in Propel Rx are sorted alphabetically by name and display in this section. If the drug has been refilled, only the most recent fill is listed. The following drugs are included:
-
Active prescriptions (including Cancelled)
-
Inactive prescriptions (e.g., Inactivated, Discontinued, Transferred, Revoked, Suspended) if the Written Rx Date falls within the date range specified by the Check for Interactions (days) preference in Propel Rx
Incomplete and Queued prescriptions are excluded.
You can hover over the i icon to view a tooltip with the following information:
The colour of the i icon indicates whether the prescription is Active (grey) or Inactive (red).
-Prescription stopped - Stop Date for the prescription if it was entered in the Administration Details window or the Performed On Date if the prescription was Discontinued.
-Prescription # and Qty
-SIG
-Date of Issue - Written Rx Date for the New or ReAuth prescription. This date is not changed on a refill.
-End Date- Rx Expiry Date for the prescription in the Rx Detail Extended tab.
-Prescriber
The Add a Medication button can be used to add a drug to the Medications list in RxConsultAction for your own reference. The drug will not be written back to Propel Rx, nor will interaction checking be performed.
Indications and Conditions
Conditions added to the Patient Folder display in this section. Other types of clinical information (e.g., Non-Medical Allergies, Lab Work, Diet, Reactions) and custom entries added through List Maintenance are not displayed.
Indications are provided by Vigilance Santé and correspond to the drugs listed in the Medications section.
Interaction checking is not performed in RxConsultAction. The Check for Interactions (days) preference is only used to retrieve the medications list. Interaction checking will be performed by Propel Rx when the prescriptions are processed.
-
-
Do one of the following:
-
In the Search field, search for and select the Minor Ailment.
-
Select the Minor Ailments tab at the top and from the dropdown list, select the Minor Ailment.
The Minor Ailment form launches. The content of the form for each Minor Ailment differs but the layout is similar.
-
-
Select a Service date and time that corresponds to when the consultation took place.
-
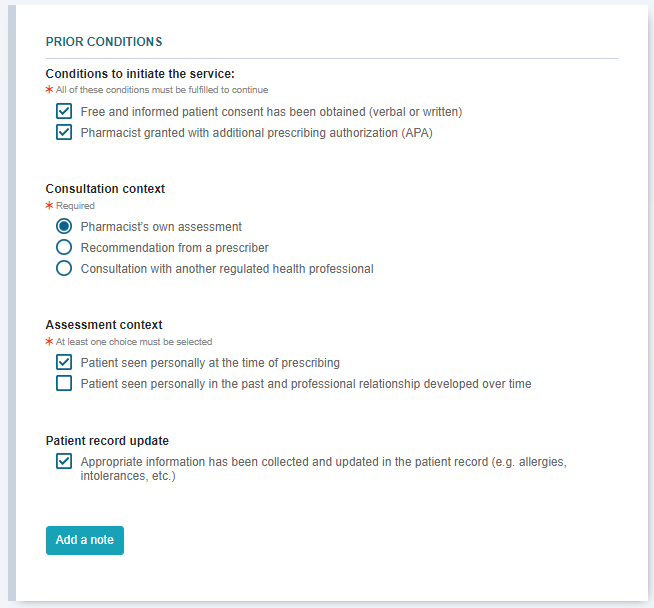
In the Prior Conditions section:
-
Select the checkboxes for patient consent and APA designation.
-
Select the context for the consultation.
-
Depending on the context chosen, select the applicable checkbox(es) for assessment context. If the consultation was conducted based on a recommendation from a prescriber or other regulated health professional, enter information about the professional and their recommendation, if desired.
-
Optional - Select the Patient record update checkbox if applicable.
-
Optional - If additional free-form notes need to be added, select the Add a note button and enter the information in the textbox provided. Notes added using this button will appear on the forms.
-
-
For some Minor Ailment services, a Context Assessment section may be visible. In this section, select the option that describes the suspected ailment.
-
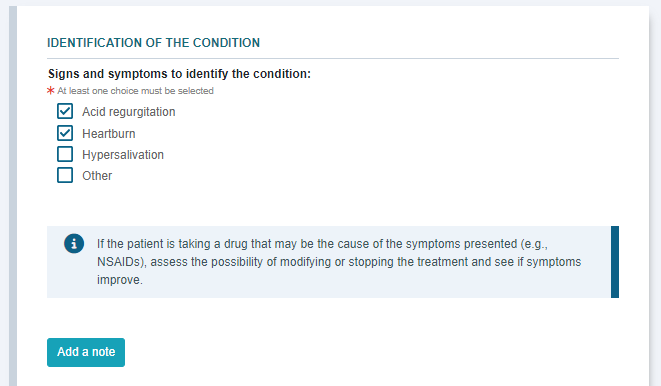
In the Identification of the Condition section, select the checkboxes for the signs and symptoms that the patient presented. If Other is selected, a textbox appears for you to enter additional information.
-
In the Exclusion Conditions section, select the checkboxes for one or more exclusion conditions that the patient qualifies for.
If an exclusion condition is selected, you may be required to enter a justification or the Prescribe section may be unavailable. However, you can still conclude a consultation even if exclusions exist, and the PFS prescription will write back to Propel Rx.
-
In the Previous Treatment section:
-
Select whether pharmacological or non-pharmacological treatment was already used for this condition.
-
If a treatment was previously used, specify what treatment was used and whether it was effective or tolerated. Additional details entered will appear on the forms.
-
-
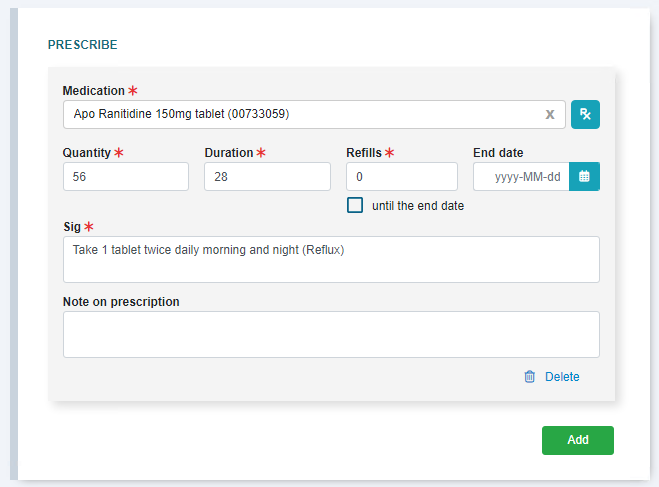
If a medication was prescribed, in the Prescribe section:
-
Select Add. The Medication Selection window opens displaying a list of drugs that can be prescribed under the pharmacist's scope of practice.
-
Select the drug that was prescribed.
In RxConsultAction, the drug's coverage status under the provincial plan is indicated with icons. A green checkmark beside the drug indicates that it's covered. An orange i indicates the drug is covered under certain conditions. A red slash indicates the drug is not covered.
-
Vigilance Santé auto-populates the following information: Medication, Quantity, Duration, Refillls, and Sig. Modify the fields if needed. An End date can be entered which becomes the prescription's End Date (in the Rx Detail Extended tab) in Propel Rx.
-
If needed, enter any free-form notes for the prescription. This will be written back to Propel Rx as a prescription level note.
For Alberta RTI pharmacies, the prescription note is added locally. To transmit the note to the EHR, you must select the EHR checkbox in the Rx Detail Notes tab of Propel Rx.
-
Repeat steps i - iv to add another prescribed medication if applicable. There is no limit on the number of medications that can be prescribed from a single form.
-
-
Optional - If advice was given to the patient during the consultation, this can be printed on the forms. To do this, in the Advice section:
-
Select Add.
-
Select the type of advice given to the patient.
-
Enter any free-form comments in the Details section.
-
Repeat steps i - iii to add more Advice entries if applicable.
-
Optional - If you want to schedule a follow-up with the patient, you can create a Minor Ailment Follow-Up Activity in Propel Rx. To do this, in the Follow Up section:
-
Select Add.
-
In the Status field, select any option. There is no difference between these options in Propel Rx.
-
In the Who field, specify who will be following up with the patient. If Me is selected, the Activity will be assigned to the pharmacist who completed the Minor Ailment service. If any other option is selected, no user will be assigned to the Activity.
-
In the When field, select when the follow-up will occur.
When does my Activity appear in the Activities tile?
What was selected in RxConsultAction? What is the Scheduled Date in Propel Rx? At first opportunity Within 15 minutes after the Minor Ailment service was completed in RxConsultAction. On a specific date Within 15 minutes of the specified date and time. Following a specific date Within 15 minutes of the current time on the specified date.
Between two dates Within 15 minutes of the current time on the first date of the date range.
-
In the What section, select the checkboxes for the outcomes you'll be following up on. If desired, enter additional information in the Details section. This information will write back as Comments for the Activity.
-
If you want to schedule another Follow-Up Activity, repeat steps i - v.
-
-
Optional - If the patient was referred to another healthcare professional, you can print a referral form. To print a referral form, in the Refer section:
-
Select Add.
-
Select the healthcare professional type from the dropdown.
-
If desired, select the checkbox to include the consultation summary and prescriptions with the printed referral form.
-
Enter any free-form comments in the Comments section.
-
Repeat steps i - iv to create another referral form.
-
-
Select Conclude intervention.
-
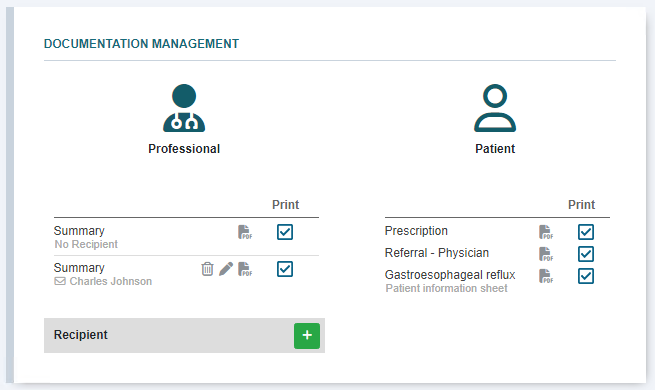
In the Documentation Management section, select the checkboxes for the forms you want to print. You don't need to print any forms to complete the Minor Ailment service.
-
Summary - can be provided to the patient's prescriber. To customize the form with a prescriber's information:
-
Select the plus button to add a recipient.
-
Select a prescriber from the dropdown list or enter information manually for the prescriber.
Only the prescribers that are associated with prescriptions for the patient in Propel Rx are listed. If you enter information manually for a prescriber, this information is not written back to the Prescriber Folder in Propel Rx.
-
Select Save to confirm the recipient.
-
Repeat steps i - iii to add another prescriber if needed.
-
-
Prescription - this is selected by default.
-
Referral - this is selected by default if the Refer section was completed on the form.
-
Patient Information Sheet - this option only appears if a sheet is available.
-
-
In the Claim section, ensure the Claim service checkbox is selected.
If this checkbox is deselected, the PFS prescription will not be auto-generated in Propel Rx, however the medication prescription(s) will still be created automatically. This can be useful if the RxConsultAction website is down, and you have to manually bill the prescriptions in Propel Rx and complete documentation later.
-
Select Finish and save.
-
The specified documents are printed and information is written back to Propel Rx.
-
If you have Cloud Fax, the Professional Summary is automatically faxed to the recipient prescriber(s). If Cloud Fax is not enabled, automatic faxing will not occur; you must manually fax the printed form. For more information, see Notifying the Prescriber of a Minor Ailment Service.
-
A success message appears in the top right corner of Patient Centre upon successful completion of the Minor Ailment service in RxConsultAction. This message will remain visible for 15 seconds or until you click on it.
If you are using an iPad, do not select Print as an error will appear. You can print the documents if needed from Propel Rx (see Printing an Attachment for guidance). Please note, even if the error is invoked, documentation will still write back to Propel Rx.
-
-
Do one of the following:
-
Select X to close the RxConsultAction window and return to Propel Rx.
-
If you need to perform another Minor Ailment service for the same patient, select Return to homepage to initiate another consultation.
-
Once a Minor Ailment service is initiated, documentation must be completed in RxConsultAction. Information is then written back to Propel Rx upon completion.
Do NOT close Patient Centre while RxConsultAction is open. If Patient Centre is closed, no write-back will occur to Propel Rx after documentation is complete in RxConsultAction.
To document a Minor Ailment service in RxConsultAction:
-
In RxConsultAction, review the patient's basic, clinical, and profile information on the right side. This information was sent from Propel Rx to RxConsultAction. To learn more about each section, select the dropdowns below.
Basic Information
If the patient's height and weight are entered in the Patient Folder, they are displayed in this section. The Body mass index and Body surface area are calculated automatically based on the height and weight.
Allergies
Allergy Groups and Medical Allergies added to the Patient Folder display in this section. Other types of clinical information (e.g., Non-Medical Allergies, Lab Work, Diet, Reactions) and custom entries added through List Maintenance are not displayed.
Medications
The drugs on the patient's Profile in Propel Rx are sorted alphabetically by name and display in this section. If the drug has been refilled, only the most recent fill is listed. The following drugs are included:
-
Active prescriptions (including Cancelled)
-
Inactive prescriptions (e.g., Inactivated, Discontinued, Transferred, Revoked, Suspended) if the Written Rx Date falls within the date range specified by the Check for Interactions (days) preference in Propel Rx
Incomplete and Queued prescriptions are excluded.
You can hover over the i icon to view a tooltip with the following information:
The colour of the i icon indicates whether the prescription is Active (grey) or Inactive (red).
-Prescription stopped - Stop Date for the prescription if it was entered in the Administration Details window or the Performed On Date if the prescription was Discontinued.
-Prescription # and Qty
-SIG
-Date of Issue - Written Rx Date for the New or ReAuth prescription. This date is not changed on a refill.
-End Date- Rx Expiry Date for the prescription in the Rx Detail Extended tab.
-Prescriber
The Add a Medication button can be used to add a drug to the Medications list in RxConsultAction for your own reference. The drug will not be written back to Propel Rx, nor will interaction checking be performed.
Indications and Conditions
Conditions added to the Patient Folder display in this section. Other types of clinical information (e.g., Non-Medical Allergies, Lab Work, Diet, Reactions) and custom entries added through List Maintenance are not displayed.
Indications are provided by Vigilance Santé and correspond to the drugs listed in the Medications section.
Interaction checking is not performed in RxConsultAction. The Check for Interactions (days) preference is only used to retrieve the medications list. Interaction checking will be performed by Propel Rx when the prescriptions are processed.
-
-
Do one of the following:
-
In the Search field, search for and select the Minor Ailment.
-
Select the Minor Ailments tab at the top and from the dropdown list, select the Minor Ailment.
The Minor Ailment form launches. The content of the form for each Minor Ailment differs but the layout is similar.
-
-
Select a Service date and time that corresponds to when the consultation took place.
-
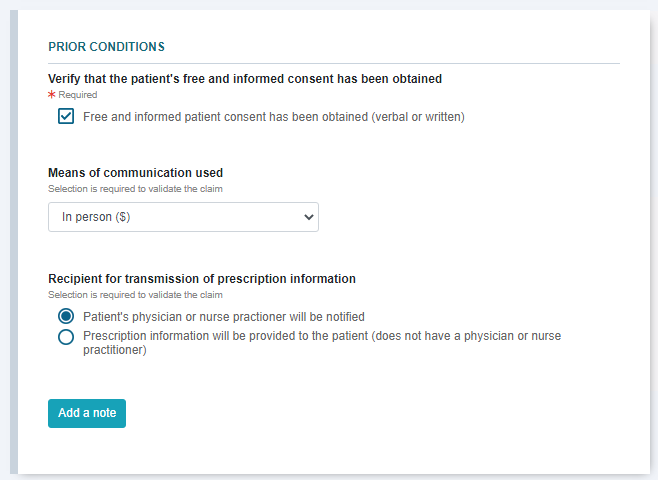
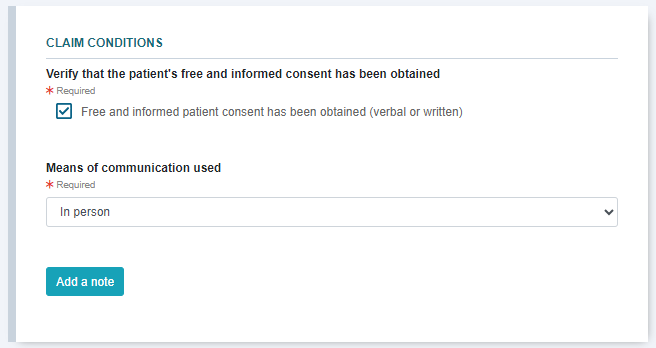
In the Claim Conditions section:
-
Select the checkbox for patient consent and select the method of communication that was used for the consultation.
-
Optional - If additional free-form notes need to be added, select the Add a note button and enter the information in the textbox provided. Notes added using this button will appear on the forms.
-
-
In the Identification of the Condition section, select the checkboxes for the signs and symptoms that the patient presented. If Other is selected, a textbox appears for you to enter additional information.
-
In the Exclusion Conditions section, select the checkboxes for one or more exclusion conditions that the patient qualifies for.
If an exclusion condition is selected, you may be required to enter a justification or the Prescribe section may be unavailable. However, you can still conclude a consultation even if exclusions exist, and the PFS prescription will write back to Propel Rx.
-
If a medication was prescribed, in the Prescribe section:
-
Select Add. The Medication Selection window opens displaying a list of drugs that can be prescribed under the pharmacist's scope of practice.
-
Select the drug that was prescribed.
In RxConsultAction, the drug's coverage status under the provincial plan is indicated with icons. A green checkmark beside the drug indicates that it's covered. An orange i indicates the drug is covered under certain conditions. A red slash indicates the drug is not covered.
-
Vigilance Santé auto-populates the following information: Authorized Medication, Quantity, Duration, Refillls, and Sig. Modify the fields if needed. An End date can be entered which becomes the prescription's End Date (in the Rx Detail Extended tab) in Propel Rx.
-
If needed, enter any free-form notes for the prescription. This will be written back to Propel Rx as a prescription level note.
-
Repeat steps i - iv to add another prescribed medication if applicable. There is no limit on the number of medications that can be prescribed from a single form.
-
-
Optional - If advice was given to the patient during the consultation, this can be printed on the forms. To do this, in the Advice section:
-
Select Add.
-
Select the type of advice given to the patient.
-
Enter any free-form comments in the Details section.
-
Repeat steps i - iii to add more Advice entries if applicable.
-
Optional - If you want to schedule a follow-up with the patient, you can create a Minor Ailment Follow-Up Activity in Propel Rx. To do this, in the Follow Up section:
-
Select Add.
-
In the Status field, select any option. There is no difference between these options in Propel Rx.
-
In the Who field, specify who will be following up with the patient. If Me is selected, the Activity will be assigned to the pharmacist who completed the Minor Ailment service. If any other option is selected, no user will be assigned to the Activity.
-
In the When field, select when the follow-up will occur.
When does my Activity appear in the Activities tile?
What was selected in RxConsultAction? What is the Scheduled Date in Propel Rx? At first opportunity Within 15 minutes after the Minor Ailment service was completed in RxConsultAction. On a specific date Within 15 minutes of the specified date and time. Following a specific date Within 15 minutes of the current time on the specified date.
Between two dates Within 15 minutes of the current time on the first date of the date range.
-
In the What section, select the checkboxes for the outcomes you'll be following up on. If desired, enter additional information in the Details section. This information will write back as Comments for the Activity.
-
If you want to schedule another Follow-Up Activity, repeat steps i - v.
-
-
Optional - If the patient was referred to another healthcare professional, you can print a referral form. To print a referral form, in the Refer section:
-
Select Add.
-
Select the healthcare professional type from the dropdown.
-
If desired, select the checkbox to include the consultation summary and prescriptions with the printed referral form.
-
Enter any free-form comments in the Comments section.
-
Repeat steps i - iv to create another referral form.
-
-
Select Conclude intervention.
-
In the Documentation Management section, select the checkboxes for the forms you want to print. You don't need to print any forms to complete the Minor Ailment service.
-
Summary - can be provided to the patient's prescriber. To customize the form with a prescriber's information:
-
Select the plus button to add a recipient.
-
Select a prescriber from the dropdown list or enter information manually for the prescriber.
Only the prescribers that are associated with prescriptions for the patient in Propel Rx are listed. If you enter information manually for a prescriber, this information is not written back to the Prescriber Folder in Propel Rx.
-
Select Save to confirm the recipient.
-
Repeat steps i - iii to add another prescriber if needed.
-
-
Prescription - this is selected by default.
-
Referral - this is selected by default if the Refer section was completed on the form.
-
Patient Information Sheet - this option only appears if a sheet is available.
-
-
In the Claim section, ensure the Claim service checkbox is selected.
If this checkbox is deselected, the PFS prescription will not be auto-generated in Propel Rx, however the medication prescription(s) will still be created automatically. This can be useful if the RxConsultAction website is down, and you have to manually bill the prescriptions in Propel Rx and complete documentation later.
-
Select Finish and save.
-
The specified documents are printed and information is written back to Propel Rx.
-
If you have Cloud Fax, the Professional Summary is automatically faxed to the recipient prescriber(s). If Cloud Fax is not enabled, automatic faxing will not occur; you must manually fax the printed form. For more information, see Notifying the Prescriber of a Minor Ailment Service.
-
A success message appears in the top right corner of Patient Centre upon successful completion of the Minor Ailment service in RxConsultAction. This message will remain visible for 15 seconds or until you click on it.
If you are using an iPad, do not select Print as an error will appear. You can print the documents if needed from Propel Rx (see Printing an Attachment for guidance). Please note, even if the error is invoked, documentation will still write back to Propel Rx.
-
-
Do one of the following:
-
Select X to close the RxConsultAction window and return to Propel Rx.
-
If you need to perform another Minor Ailment service for the same patient, select Return to homepage to initiate another consultation.
-