Getting Started on Accounts Receivable
This topic is intended for Independent pharmacies only and is not applicable to Rexall pharmacies.
Before assigning any patients to Accounts Receivable plans, determine if you will be using multiple plan codes (i.e., use a different code for each LTC Facility), if any Pricing Strategies are required, and if you want to assign an Accounts Receivable plan to a Group. You can also set validation checks to warn you of overdue Accounts Receivable plans while processing prescriptions.
Customizing Accounts Receivable Plans
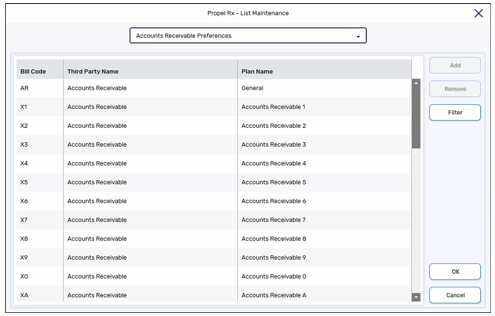
Accounts Receivable Preferences in List Maintenance allows the Plan Name for each Accounts Receivable plan to be customized, and therefore easily identified throughout Propel Rx.
-
Select More > List Maint. The List Maintenance window opens.
-
Select the Accounts Receivable Preferences from the dropdown list at the top of the window.
-
Select the Accounts Receivable plan to be customized.
-
Enter the customized name in the Plan Name field for the corresponding Bill Code.
-
Select OK to save the changes and close the window.
When customizing the Plan Name, enter the bill code in front of the name to ensure it is easily identified in other areas of the application (i.e., when setting up Pricing Strategies). For example, if XW was set up for billing patients in Winsome Woods Nursing Home, enter the Plan Name as XW - Winsome Woods.
Setting Up Pricing Strategies for Accounts Receivable
Pricing strategies can be set for Accounts Receivable in general, as well as for each Accounts Receivable plan. As with all other Third Parties, Pricing Strategies are set in the Pricing module.
-
Select More > Pricing.
-
Enter Pricing Strategies as required.
-
Select Save to save your changes.
Related Topics
Setting AR Overdue Days Validation
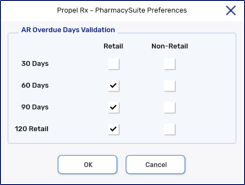
The PharmacySuite Preferences provide the ability to set overdue days validation checking for both retail and non-retail prescriptions. For example, you may want to be warned when a retail patient's Accounts Receivable plan is overdue, but you may not be concerned about non-retail patients. In this case, AR Overdue Days Validation allows you to suppress the "AR account is XXX DAYS OVERDUE" Rx Detail alert for Nursing Home and other types of non-retail patients.
-
Select More > Pharmacy.
-
Select PharmacySuite. The PharmacySuite Preferences window opens.
-
In the Retail column, choose the minimum number of days for which you would like to be warned if the patient's account is overdue; all other days above the maximum become selected as well (i.e., if you choose 60 Days, the checkboxes for 90 Days and 120 Days are automatically selected).
-
To be warned of overdue plans for non-retail prescriptions, make the necessary selections in the non-retail column. Leave the column blank if you do not wish to be warned for non-retail prescriptions.
-
Select OK.
Setting an Accounts Receivable Plan as a Group's Default Billing Code
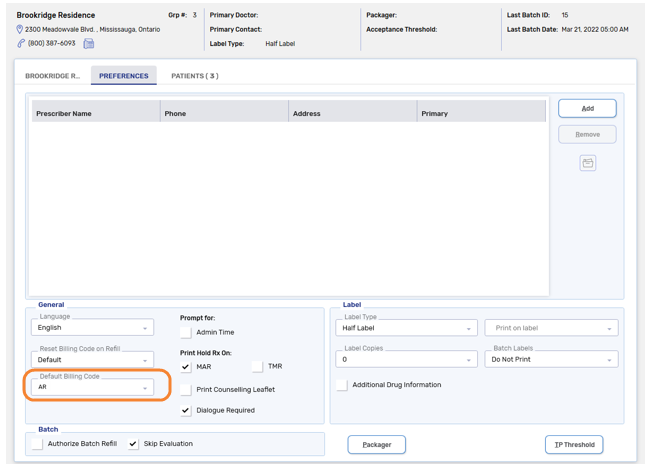
When an Accounts Receivable plan is set as a Group's default billing code, all new patients added to the Group are automatically assigned that Accounts Receivable plan. This ensures the patients are assigned to the appropriate plan for that Group and is useful if specific Pricing Strategies are used for a Group's Accounts Receivable plan.
-
Select the Batch Manager button
 .
. -
Select the Groups tab.
-
Select the Group.
-
Select Detail.
-
Select the Preferences tab.
-
Select the appropriate Accounts Receivable plan code from the Default Billing Code field.
The default billing code only applies to patients newly added to the Group. You must manually add the appropriate Accounts Receivable billing code to all patients who already belong to the Group.
-
Select Save.
Running Batches for Groups
The first time you run a Batch for a Group after moving to an Accounts Receivable Posting, the Reset Billing Code on Refill Pharmacy Preference must be ON to ensure prescriptions reset to include AR when it is first added to the patient:
-
Select More > Pharmacy > Rx Detail.
-
If Reset Billing Code on Refill is OFF, select the checkbox to turn it ON.
-
Select Save.
After the Batch completes, turn OFF Reset Billing Code on Refill - this ensures the appropriate billing code is retained for prescriptions on all subsequent Batches.
Verifying Customer AR Statements
For the first month after activation of integration, it is recommended that you compare the Customer AR Statements to the Propel Rx Patient Official Receipt report.
Generate a Patient Official Receipt report in Propel Rx for the same time period as your Customer AR Statement from Propel POS.
To run the Patient Official Receipt report:
-
Select More > Reports > Propel Rx Reports.
-
In the Select a Report window, select Patient on the left side.
-
Select the Patient Official Receipt report.
-
Select Next The Criteria tab opens for the Patient Official Receipt report.
-
Enter a Start Date and End Date to match the Customer AR Statements.
-
Enter the name of the Group in the Group field.
-
Select Preview. If the Group Search appears, search for and select the Group. The report is displayed in the Preview window.
-
Select Print.
Once both reports have been generated, BEFORE any statements are sent out, cross-reference both reports to ensure that no billings have been missed. Correct any billings where required, using the Troubleshooting Tips below.
Related Topics
Patient Official Receipt Report
Troubleshooting Tips
If billing is on the Patient Official Receipt report and not on the Customer AR Statement:
-
For any missing prescriptions, open the prescription in Rx Detail and check the Alerts section for any alerts pertaining to the customer account (i.e., AR is OVER CREDIT LIMIT). Make any necessary adjustments to the customer's credit limit in the Propel POS system, and then Rebill the prescription.
-
Verify if the customer code in Propel Rx matches the customer code in Propel POS. Make any necessary corrections to the code in Propel Rx.
-
Ensure the AR bill code is flagged as Active in the Patient Third Party tab:
-
Open the Patient Folder.
-
Select the Third Party tab.
-
Verify if the Active checkbox is ON for the AR row. If Active is OFF, select the checkbox to turn it ON.
-
Select Save.
-