Compliance Packaging Exception Handling or Troubleshooting
When processing compliance packaged prescriptions, there are a few exception handling issues or troubleshooting that may require intervention.
Use the dropdowns below to learn more.
On occasion, due to availability or interchangeability, a medication brand change may be required.
To correct a medication's brand:
-
From the Workbench, select Correct > Rebill. The Select Prescription window appears.
-
In the Rx(s) field, enter the prescription number(s) that require a brand correction.
-
Once in Rx Detail, change the medication as require and process the prescription.
-
From the Workbench, select the Packaging queue.
-
In the Compliance tab, filter and highlight the Rebilled prescription (or any prescription in that Group).
-
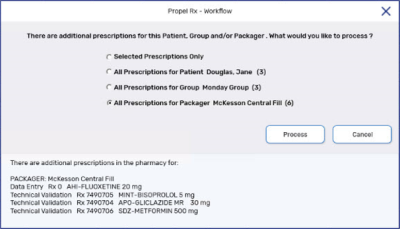
Select Process. A prompt displays.
-
Select All Prescriptions for Packager.
-
Select Process. The Compliance Automated Packaging window appears.
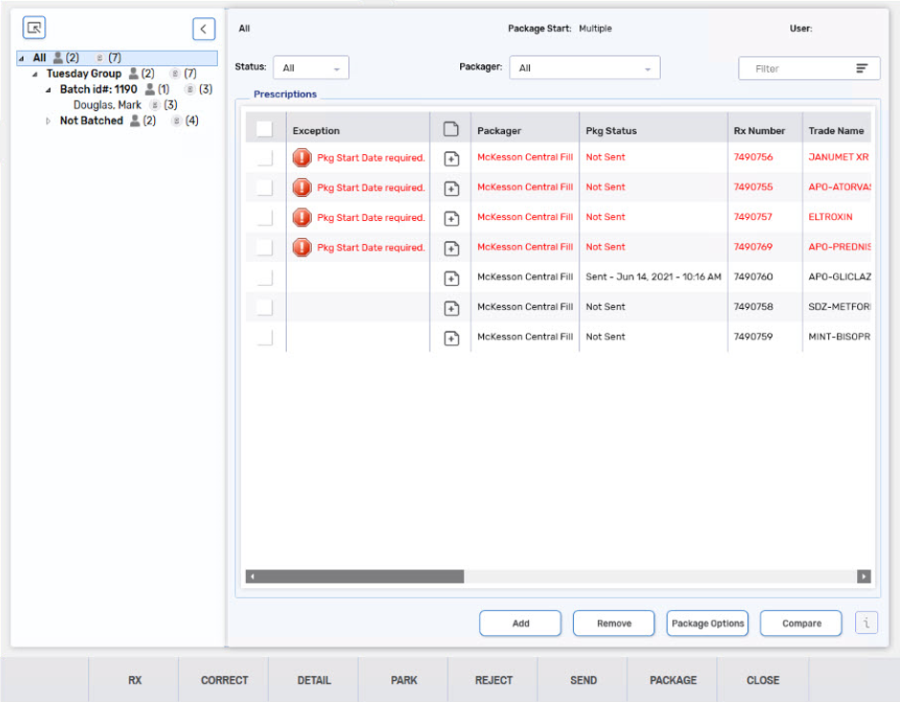
For more information, see Compliance Automated Packaging Window Overview.
- Review and process the file to the packager as usual.
If you notice in the Compliance Automated Packaging window that a patient is in the incorrect Group, the patient must be moved to another Group from the Patient Folder.
To change a Group a patient is currently in:
-
Search for and select the patient.
-
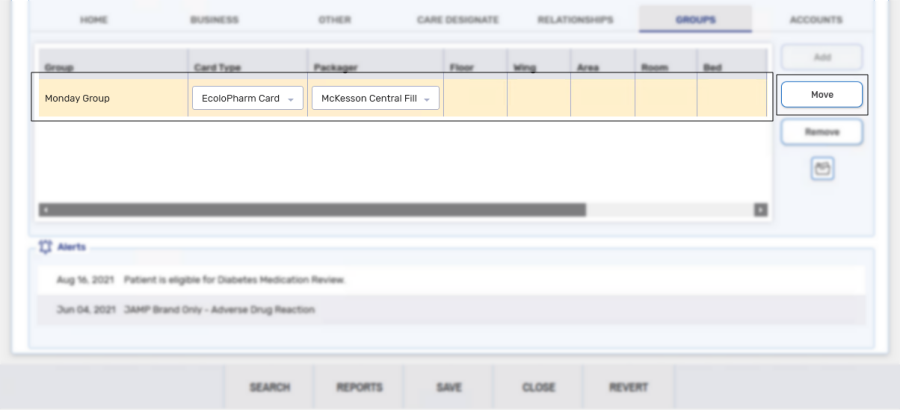
From the Main tab, select the Groups tab.
-
Highlight the Group and select Move.
-
The Group Search window appears.
-
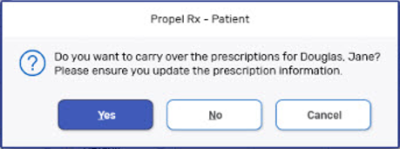
Search for and select the new Group. A prompt displays.
-
Select Yes to carry over all prescriptions for the patient.
The Group Name column in the Compliance Automated Packaging window will update.
If prescriptions are missing a Pkg Start Date, the Compliance Automated Packaging window will display a Pkg Start Date required warning in the Exception column. This can happen if a prescription was processed outside of a Batch.
-
Highlight all the prescriptions that require the same package start date and select Package Options.
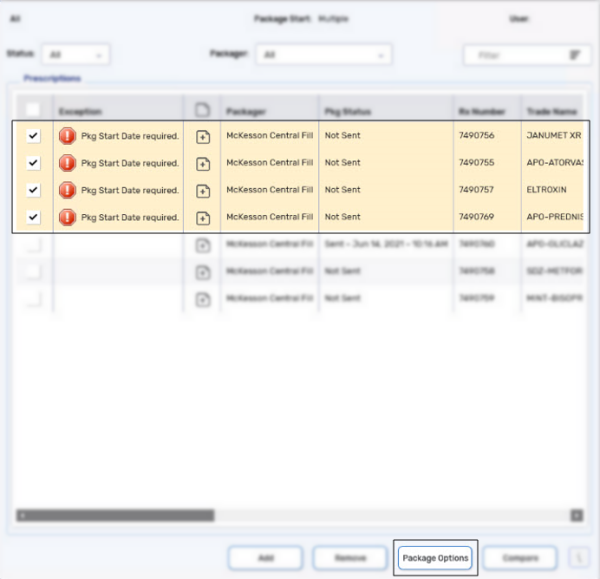
The Package Options window appears.
-
Select a Package Start Date.
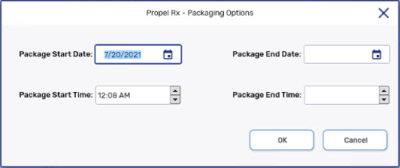
Package Start Time, Package End Date and Package End Time are optional.
-
Select OK. The window closes and the exception is removed.
prescriptions can be added or removed from the Compliance Automated Packaging window, if required.
Adding a Prescription
To add a prescription to the Compliance Automated Packaging window:
-
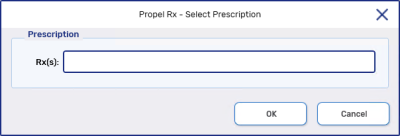
From the Compliance Automated Packaging, select Add. The Select Prescription window appears.
-
Enter the prescription numbers(s) of the prescriptions that should be added.
-
Select OK.
To be successfully added into the Compliance Automated Packaging window, prescriptions required a Workflow status of Packaging and be assigned to a compliance packager.
Removing a Prescription
To remove a prescription from the Compliance Automated Packaging window:
-
From the Compliance Automated Packaging window, highlight the prescription(s) and select Remove. A confirmation prompt appears.

-
Select OK.
The prescription is removed from the Compliance Automated Packaging window and will not be transmitted to the Central Fill location or packager, but will maintain it's Workflow status.
To identify a patient with a wrong card type, select the Compare. The Compare function will validate each patient and their respective card type.
To correct the wrong Card Type selected:
-
From the Compliance Automated Packaging window, search or filter for the patient that the warning is associated to.
-
Review the Packager column.
-
Highlight the prescription(s) with the incorrect packager and select Remove.
-
Either close the Compliance Automated Packaging or open another instance and Rebill the prescriptions.
-
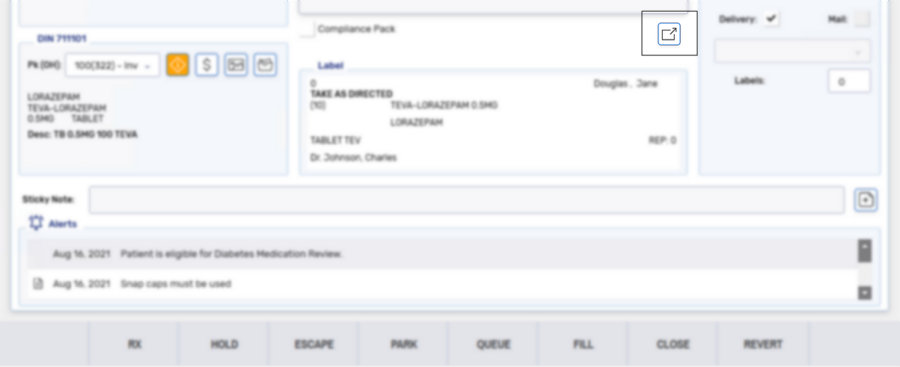
Once in Rx Detail, open the Administration Details window by selecting the expander icon
 .
.
-
In the Administration Details window, select the packager from the Packager dropdown.

-
Select OK. The Administration Details window closes.
-
Process the prescription as usual.
If the dosages entered in the Administration Details window do not match the quantity in the prescription, the Compliance Automated Packaging window will display a Dosages do not Match Rx Qty warning in the Exception column.
To correct the dosages:
-
From the Workbench, select Correct > Rebill. The Select Prescription window appears.
-
In the Rx(s) field, enter the prescription number(s) whose dosages do not match the prescription quantity.
-
Once in Rx Detail, edit the days supply if it does not match the quantity entered.
-
Open the Administration Details window by selecting the expander icon
 .
.
-
In the Administration Details window, edit the following if they do not match the quantity and days supply in the prescription:
-
Frequency
-
Dosages in the Passtimes/Admin Times table
-
Stop Date, if any
-
-
Select OK. The Administration Details window closes.
-
Process the prescription as usual.
This is applicable to prescriptions packaged by a PacMed only.
In some situations, a dose may be dropped during medication administration and discarded. For example, a strip was delivered to a patient on Friday to start the medication on Monday. A dose was then discarded halfway through the week on a Wednesday.
To process a discarded dose:
-
Highlight the prescription from the Patient Profile.
-
Select Correct > Amend. Rx Detail opens.
-
Select Save. The prescription will be added back to the Packaging queue of the Compliance tab.
-
Select No to print new Vial label(s).
-
Process the prescription from the Packaging queue on the Workbench. Ensure to choose the Selected Prescriptions Only option from the Workflow prompt.
-
In the Compliance Automated Packaging window, select the prescription that requires a replacement dose.
-
Select Package Options. The Packaging Options window opens.
-
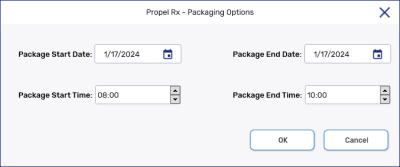
Select a Package Start Date and Package End Date to just cover the discarded dose.
If only 1 dose was discarded and it occurred on a Wednesday, choose Wednesday as the Package Start Date and Package End Date.
-
Select a Package Start Time and Package End Time to just cover the discarded dose.
If the medication was taken three times daily at 09:00, 15:00, and 23:00, but the 09:00 dose was discarded, the Package Start Time and Package End Time can be 08:00 and 10:00 respectively. This way, only the discarded dose is packaged.
-
Select OK.
It is expected that a Dosages do not Match Rx Qty exception appears for the prescription because the dose and prescription quantity don't match. This is acceptable as you are purposely running a shorter date range.
-
Select the prescription that requires a replacement dose.
-
Select Send. The Pkg Status is updated to a status of Sent.
-
Once the dose is confirmed to be packaged, select the Package button to complete Packaging for the prescription.
This is applicable to prescriptions packaged by a PacMed only.
In some situations, a prescriber may add a new dose to an existing medication after the patient's strip has been packaged. For example, a prescriber changes the frequency of administration for a medication from twice daily to three times daily. You may want to send the new dose separately and tape the pouches to the already packaged strip, rather than resend all the prescriptions.
To send a new dose to PacMed:
-
Do one of the following:
-
If the patient brings in a new prescription, process it as per usual process.
-
If the existing prescription needs to be corrected, Rebill it.
Ensure the updated dosing regimen is entered in the Administration Details window.
-
-
Process the prescription from the Packaging queue on the Workbench. Ensure to choose the Selected Prescriptions Only option from the Workflow prompt.
-
In the Compliance Automated Packaging window, select the prescription.
-
Select Package Options. The Packaging Options window opens.
-
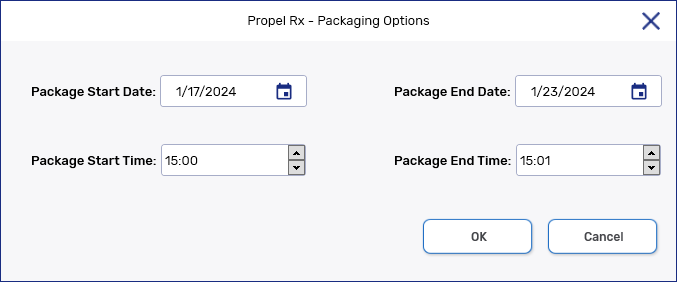
Select a Package Start Date and Package End Date to cover the compliance period.
-
Select a Package Start Time and Package End Time to cover the new dose. Ensure the time span does not encompass any other doses that have already been packaged.
If a medication was previously sent with 09:00 and 23:00 administration times but the prescriber added a 15:00 administration time, the Package Start Time and Package End Time could be 15:00 and 15:01 respectively. This way, only the 15:00 doses are packaged for the compliance period.
-
Select OK.
It is expected that a Dosages do not Match Rx Qty exception appears for the prescription because the dose and prescription quantity don't match. This is acceptable as you are purposely packaging only the new doses.
-
Select the prescription.
-
Select Send. The Pkg Status is updated to a status of Sent.
-
Once the new doses are confirmed to be packaged, select the Package button to complete Packaging for the prescription.
In some situations, you may need to return a previously sent or packaged prescription to the Packaging queue of the Compliance tab.
If the prescription requires no edits, has a Workflow status of Packaging, and was simply not captured when the Compliance Automated Packaging (CAP) window was opened, select Add and input the prescription number in the prompt to import the prescription into the CAP window.
To resend a prescription to a packager or Central Fill:
-
Highlight the prescription from the Patient Profile.
-
Select Correct > Amend. Rx Detail opens.
-
Make any changes, if necessary.
-
Select Save. The prescription appears in the Packaging queue of the Compliance tab.
In some situations, you may want to package more dosages than was billed for in the prescription. For more information on how to accomplish this, see Packaging More Than the Days Supply. When this is done, the following exception appears in the Compliance Automated Packaging window:

If you want to send future dated dosages to the packager, you do not need to manage this exception. If this was unintentional, follow the steps below to address the exception.
To correct unintended extended dosages:
-
Highlight all the prescriptions that have unintended extended dosages. The Packaging Options window appears.
-
Review the Package End Date and confirm if it's appropriate. If you want to package only the days supply billed in the prescription, remove the Package End Date.

-
Select OK. The window closes.
If the patient no longer requires a compliance package that has already been made and delivered by Central Fill:
-
Return the medications to stock.
-
Refuse all compliance package prescriptions.
-
Manually adjust the On Hand for the medications that have been returned to stock, using the reason Return to Stock - Central Fill. This is necessary because Central Fill prescriptions are not decremented from inventory when filled or incremented when cancelled.
If a patient's medications are split into separate compliance packages unintentionally, check the Package Start Date. If they are different between prescriptions, the prescriptions will be packaged in separate packs.
To set the Package Start Date from the Compliance Automated Packaging window:
-
Highlight all the prescriptions that require the same package start date and select Package Options. The Package Options window appears.
-
Select a Package Start Date.

Package Start Time, Package End Date and Package End Time are optional.
-
Select OK.