Adding Patients to a Non-Retail Group
Patients can be added to a non-retail group through the Patient Folder or Group Folder. When a patient is added to a non-retail group, the group's default billing code, as set in Group Preferences, will be automatically added to the patient's list of Third Parties.
Adding Patients from the Patient Folder
To add patients to a retail group:
-
From the Workbench, select the Patient navigator button. The Patient Search window appears.
-
Search for and select a patient.
If the patient is new, you must create a Patient Folder first. For more information, see Patient Folder Creation.
-
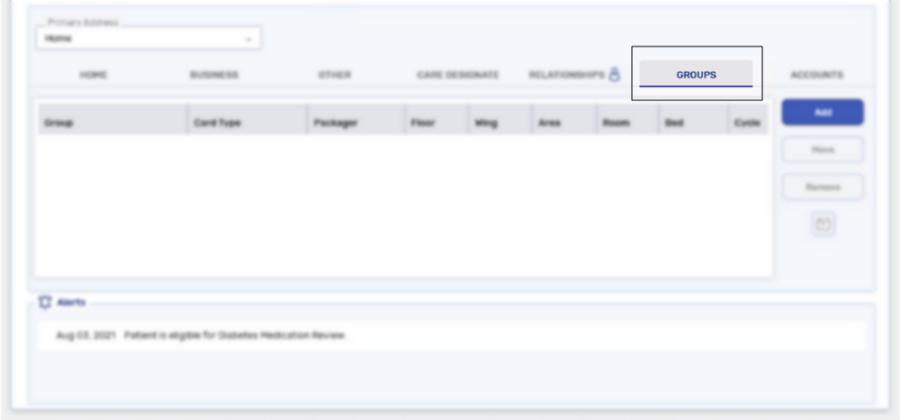
From the Main tab of the Patient Folder, select the Groups tab.
-
Select Add.

The Groups Search window appears.
-
Search for and select the group.
If the group does not already exist, a new group must be created. For more information, see Creating a New Group.
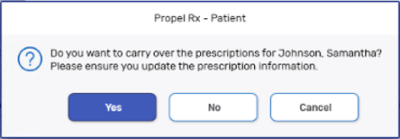
A validation prompt appears.
-
Select Yes. The Assign Standing Orders window opens if the group has any active Standing Orders.
If No is selected, the prescription are Inactivated in the Profile tab.
-
Select any Standing Orders applicable to the patient, and then select Process to create the prescriptions. Select Skip if the patient does not have any Standing Orders. The window returns to the Group Folder Patients tab.
-
Optional: Enter the Floor, Wing, Area, Room, Bed, Cycle, and/or Admission Date for the patient.
-
Select Save. Propel Rx adds the group's default billing code to the Patient Folder Third Party tab, if applicable.
A patient cannot be added to a Group if they have pending or incomplete prescriptions. These prescriptions must be completed or cancelled before adding a patient to a Group.
-
If you created Standing Order prescriptions in step 7, continue processing them from the Workbench as usual.
Adding Patients from the Group Folder
To add patients to a retail group:
-
From the Workbench, select the Batch Manager navigator button. The Batch Manager opens.
-
Select the Groups tab.
-
Select the group.
If the group does not already exist, a new group must be created. For more information, see Creating a New Group.
-
Select Detail.
-
Select the Patients tab.

-
Select Add. The Patient Search window opens.
-
Search for and select the patient. A validation prompt appears.
-
Select Yes. The Assign Standing Orders window opens if the group has any active Standing Orders.
If No is selected, the prescriptions are Inactivated in the Profile tab.
-
Select any Standing Orders applicable to the patient, and then select Process to create the prescriptions. Select Skip if the patient does not have any Standing Orders. The window returns to the Group Folder Patients tab.
-
Optional: Enter the Floor, Wing, Area, Room, Bed, Cycle, and/or Admission Date for the patient.
-
Select Save. Propel Rx adds the group's default billing code to the Patient Folder Third Party tab, if applicable.
A patient cannot be added to a group if they have pending or incomplete prescriptions. These prescriptions must be completed or cancelled before adding a patient to a group.
-
If you created Standing Order prescriptions in step 9, continue processing them from the Workbench as usual.