Scheduling a Batch
When scheduling a batch, there are three main parts to consider:
Part 1: Select a Group
Prescriptions can only be processed in a batch if they are a part of a group. The group must be made and the patients added to it before you begin batching. The learn more information about groups, see Groups.
To select a group:
-
From the Workbench, select the Batch Manager navigator button
 .
. -
From the Batch History tab, select Refill. The Batch Refill window appears.
-
Enter the following information:
-
Group - the group name.
-
Optional: Area, Cycle, Floor, Wing - enter the area, cycle, floor, OR wing to batch.
-
Optional: Ready Time - enter an appropriate ready time. This is not the time the batch will be scheduled for.
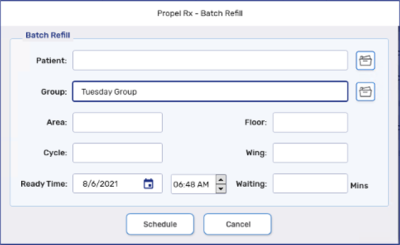
Refill can be used for new or previously scheduled batches. If a completed batch is highlighted in the Batch History tab and Refill is selected, the Batch Refill window will be prepopulated based on the parameters entered for the previous batch.
-
-
Select Schedule. The Group Search window appears.
-
Select the group.
-
Select OK. The Batch Preferences window appears.
-
Proceed to Part 2: Set up Batch Preferences.
Part 2: Set up Batch Preferences
Setting up batch preferences must be done each time a batch is scheduled.
To set up Batch Preferences:
-
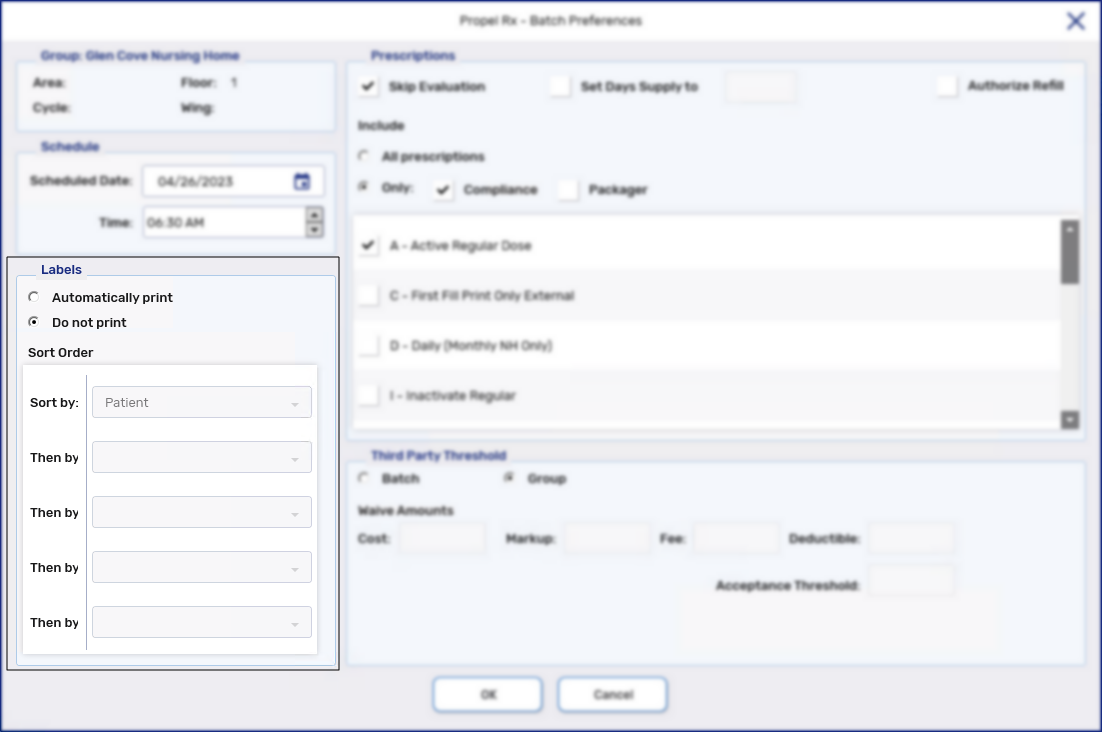
In the Schedule section, enter the following information:
-
Scheduled Date
-
Time
Avoid scheduling a batch to run between 12:00am - 5:30am. If scheduled during this timeframe, the batch may not process due to scheduled upgrades, Third Party maintenance, etc.

-
-
In the Labels section, select either:
-
Automatically Print
-
Do not print - labels do not print.
-
-
In the Prescriptions section, select the following:
-
Optional - Skip Evaluation checkbox - skips the Rx Detail evaluation process and minor alerts do not prevent the prescription from being processed.
This setting can be used when you are familiar with the patients' existing medications and possible interactions.
-
Optional - Set Days Supply to checkbox and field - specifies the number of days to be included in the batch. The quantity and days supply of all the prescriptions in the batch are recalculated to reflect the required days supply and displays in the Batch Profile window.
-
Optional - Only radio button - only includes certain prescriptions in the Batch. This button is used in combination with the following options:
-
Compliance - includes prescriptions with the Compliance flag on.
-
Packager - includes prescriptions being auto-dispensed to a Packager.
-
Non-Retail Group Rx Statuses - includes prescriptions with the selected Group Rx Statuses. This section is only available when scheduling batches for non-retail groups.

-
-
-
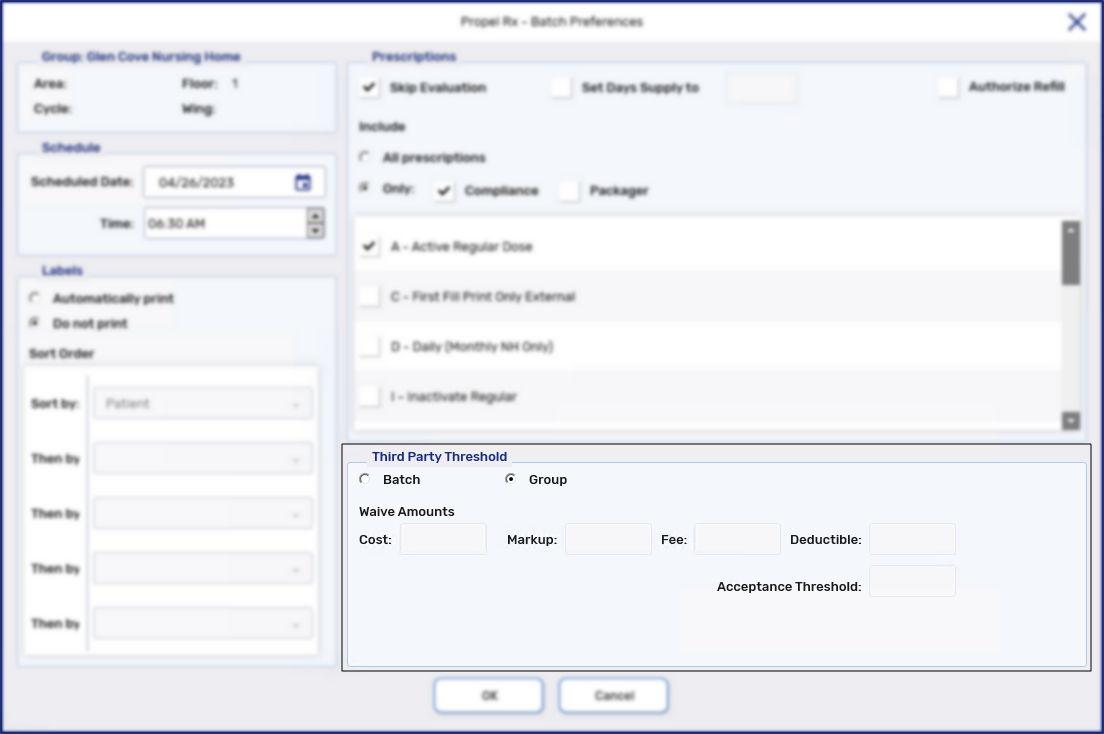
In the Third Party Threshold section, select one of the following:
-
Group - the batch assumes the TP Thresholds set in the Group Folder. This includes waive amounts set for the Cost, Markup, Fee, and/or Deductible as well as an Acceptance Threshold.
-
Batch - custom waives and an acceptance threshold can be applied to the current batch.
-
Waive Amounts - amounts entered in the Cost, Markup, Fee, or Deductible fields are deducted from all prescriptions in the batch.
-
Acceptance Threshold - determines the threshold for bypassing the Claim Summary window. Prescriptions that have a total that is less than or equal to the acceptance threshold after adjudication bypass the Claim Summary window. For all other prescriptions, the Claim Summary must be viewed and any necessary waives made before the prescription can be resubmitted to achieve a Complete status.
-
-
-
Select OK. The Batch Profile window appears.
-
Proceed to Part 3: Review the Batch Profile Window.
Part 3: Review the Batch Profile Window
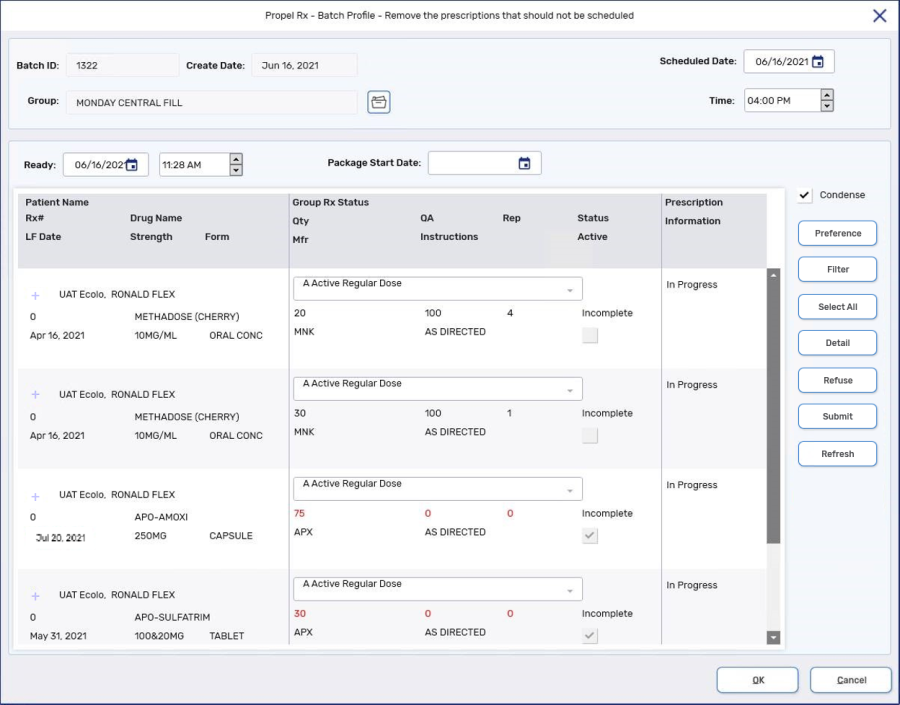
The Batch Profile window is where all the prescriptions in the batch can be viewed. This must be reviewed to ensure the correct prescriptions were chosen for the batch.
To review the Batch Profile window:
-
Scroll through the window to review the prescriptions.
-
To remove prescriptions, highlight the prescription(s) and select Remove.
Patients with a Hospitalized patient status are not pulled into a batch.
-
-
Review the Ready Time. The Ready Time is optional for Batched prescriptions.
If you detail a prescription from the Batch Profile window, you will not be prompted to enter a Ready Time if it is blank. However, if you detail a batched prescription that is currently in Data Entry from the Workbench or Patient Profile, you will be prompted to enter a Ready Time in Rx Detail.
-
Review the Scheduled Date and Time.
-
Optional - Select the Sort button. The Sort window opens.
-
Select Add. A new row is added.
-
Dropdown the Sort Columns field and select a sort option.
-
Deselect the Ascending checkbox if you want the sort to be in descending order.
-
Repeat steps 1 - 3 to add additional sorting parameters.
-
Select OK. The prescriptions are sorted according to the sort option(s) selected.
To easily identify prescriptions that have no repeats remaining, sort prescriptions by Rep in ascending order; prescriptions with zero repeats are placed at the top of the list. These prescriptions can be detailed to print authorization requests before proceeding with the batch. When the batch is complete, the prescriptions waiting for authorization remain in Data Entry until resolved, unless Authorize Refill was ON.

-
-
Select OK to schedule or begin processing the batch.
The prescriptions that are part of a scheduled batch are placed in the Data Entry queue > Compliance tab for the scheduled date and time.